


Warning: (25 May 2009) I’ve not updated this page in six years. My Series 1 TiVo died a few years ago; before it did, I had replaced it with MythTV. I’m pretty sure most of this doesn’t apply to Series 2 and newer TiVos, and in any case TiVo has finally provided a way to rip video from its newer boxes anyway, so you don’t need to jump through these hoops. Finally, you probably really want to burn your TV shows to DVD instead of SVCD; at the time I wrote this, DVD recording was (at best) in its infancy. With all that said, if you’re still running a Series 1 TiVo (maybe you, like me, paid for the lifetime subscription) and want to yank video off of it, keep reading. I’ve checked the links and fixed the ones that didn’t work.
This is supposed to be impossible. :-) With the right hardware and software, you can grab a recording off of your TiVo personal video recorder, crunch it down, and fit it on one or two CDs that you can play back on your computer or in many DVD players. Hardware and software are now available that make this possible. It’s not particularly easy or 100% foolproof, but it works.
TiVo video is recorded at 2/3 D1 (480×480) resolution at 30000/1001 frames per second with constant-bitrate MPEG-2 at one of four bitrates:
| Setting | Bitrate |
|---|---|
| Best | 5.8 Mbps |
| High | 3.5 Mbps |
| Medium | 2.6 Mbps |
| Basic | 1.47 Mbps |
Regardless of video bitrate, audio is sampled at 32 kHz and always recorded with constant-bitrate MPEG-1 Layer 2 at 192 kbps. The following changes need to be made to the video to record it to Super Video CD (SVCD):
- The video bitrate needs to be reduced, probably to 1.5-2 Mbps in most instances.
- The audio sample rate needs to be increased to 44.1 kHz.
- Since most material on TV originates on film, inverse telecine is desirable to reduce the number of frames that need to be encoded. This undoes the 3:2 pulldown applied to film when it is transferred to NTSC video for broadcast, and also converts interlaced video to non-interlaced. For most programs, this will produce much better results.
While we’re at it, we might as well snip out the commercials. Less material to encode will also yield better quality for what gets kept.
With that said, here’s what you’ll need to save your favorite shows to SVCD:
- A Series 1 TiVo PVR, of course (mine’s a Philips HDR112, with the original hard drive replaced by a Western Digital 100GB 7200rpm hard drive…30+ hours of best-quality recording capacity is a Good Thing™ :-) ). The best info on the web for upgrading your TiVo with a bigger hard drive, backing up your TiVo, etc. is the Hinsdale TiVo upgrade HOWTO.(If you have a Series 2 TiVo, don’t bother asking me if this will work. Your email will be ignored. Nobody has (as of 23 May 03) figured out a way to rip from a Series 2 TiVo.)
- A TiVoNET (plus an NE2000-compatible ISA Ethernet adapter) or TurboNET board. TiVoNET is an older product that attached an off-the-shelf ISA Ethernet adapter to the diagnostic connector on the TiVo motherboard. It’s what I have in my TiVo, but it’s been discontinued. TurboNET is a Fast Ethernet adapter that attaches to the same diagnostic connector. It’s self-contained, and I’ve heard that it runs about 2-3x faster at extraction than TiVoNET. A preassembled TurboNET with the network-connect kit will run about $76. You could also set up PPP through the TiVo’s DSS port, but this method will be extremely slow by comparison and isn’t recommended for extracting video.
- A computer running a DHCP server…your networked TiVo will get its IP address from this server. Some broadband firewall appliances (such as the ones from Linksys) have this functionality built in. In my case, I run the ISC dhcpd on the same machine that runs this website. I’d recommend setting it up with the MAC address of your TiVo’s network adapter so that you can hand out a static IP address to your TiVo. If you’re using TiVoNET, the NIC you’re using should have a label on it with its MAC address; it should look something like 01:23:45:67:89:AB. If you’re using TurboNET, there is no such label. Let your TiVo grab a dynamically-allocated IP address and get its MAC address from the ARP cache with arp -a. (You might need to ping the TiVo before its MAC address will show up.) Find your TiVo’s IP address and MAC address and use the MAC address to reconfigure your DHCP server. Reboot your TiVo and it’ll grab the address you’ve specified. (If you go into phone-dialing options and set the prefix to ,#401 (comma-number-4-0-1), your broadband connection will be used by your TiVo to get its updates. Built-in TiVoNET and TurboNET support is a new feature in 3.0 and makes setting up Ethernet dead simple.)
- Some network infrastructure to tie it all together…any old Ethernet or Fast Ethernet hub or switch and appropriate lengths of network cable to go where needed will do. Setting up a home network is beyond the scope of this document. (I would recommend using a switch instead of a hub; they’re cheap enough now that anybody can afford a switch. You don’t need a high-end switch from the likes of 3Com or Cisco (though they’re nice if you have one); any unmanaged 10/100 switch with enough ports for all your networked devices will do. Back when I first started ripping TiVo video, I used a Linksys 5-port 10/100 switched hub; this provides two shared network segments (one at 10 Mbps, the other at 100 Mbps) with a switch between the two segments. I found that other network activity tended to interrupt transfers with this arrangement, so I moved the hub to another location on the network and replaced it with a Gigafast 5-port 10/100 switch. It only cost me about $25, and I’ve not had nearly as many problems with interrupted transfers.)
- Software to rip video from the TiVo to your Windows box (detailed below).
- Software to edit the incoming video and burn it to one or more CD-Rs (detailed below).
Here’s the software you’ll need to rip the video. I have a package of binaries to install on your TiVo and some software that you’ll run under one of the NT-derived versions of Windows…preferably Win2K, but WinXP should also work and NT 4 might work. The DOS-derived versions of Windows (Win9x and WinMe) are unsuitable for TiVo extraction due to the large files (over 2 GB) that you’re likely to create during extraction and/or editing.
- My TiVo binaries package. This includes TivoWeb, mfs_stream, nc, and some useful command-line tools. I created this archive after reinstalling these packages separately following the TiVo upgrade to 3.0. Since you need these files on your TiVo and not your PC, you don’t really need to download them to your PC. Your TiVo already has a way to grab files directly from any website; read these instructions to download and install.
- TyTool. This app provides extraction and stream conversion in one stop. I’ve had only fair luck extracting video with it (it usually wedges my TiVo after two or three streams), but its tyStream-to-MPEG conversion is one of the best currently available. We’ll use it to produce MPEG elementary video and audio streams from ripped tyStreams.
Here’s the software you’ll need to edit, compress, and burn the video. All of this stuff runs under Windows. You might be able to find comparable apps for Linux, MacOS, or whatever, but this is what I use:
- The Win32 version of Netcat, which will receive video from your TiVo. (Note that this file contains just an executable…just unzip it someplace in your path. I have a directory called c:\localbin that holds programs such as this, but you could just as easily dump it into %SYSTEMROOT%\system32 if you want to leave your path alone.)
- DVD2AVI 1.86, which prepares MPEG video streams for reading with the Avisynth MPEG-2 source plugin.
- LAME 3.92 (or a newer version from the LAME website), which we use to decode the TiVo’s Layer 2 audio to WAV.
- VirtualDub, which we now use mostly for previewing and finding cutpoints. (I previously used it to frameserve into TMPGEnc, but Avisynth is more efficient and more powerful.)
- Avisynth, a powerful script-based frameserver, non-linear editor, compositor…basically, the Swiss Army Knife of Win32 video editing. Make sure you also get my package of Avisynth plugins…you’ll get an MPEG-2 decoder plugin (it works in conjunction with DVD2AVI) and an inverse-telecine plugin (handy for dealing with TV shows that started on film). Unpack the plugins to an empty directory someplace and copy the DLLs into your Avisynth plugin directory (probably c:\Program Files\Avisynth2\plugins).
- TMPGEnc, one of the best MPEG-2 encoders for Win32. That it’s cheap is an added bonus (and you can try it out for a while first).
- GNU VCDImager, which converts the SVCD-compatible MPEG-2 program stream into a BIN file and a CUE file. You might also look into VCDEasy, which combines VCDImager, CDRDAO, and some other stuff behind a frontend that makes producing SVCDs from MPEG files a bit easier. This document, though, will cover using VCDImager directly. I’ve not played enough with VCDEasy yet to write about it, but it looks fairly easy to figure out.)
- Software that can burn BIN/CUE images. Some possibilities are FireBurner and Nero. You’ll need to experiment to see which one will work with your burner. If you’re using VCDEasy (mentioned above), CDRDAO will do this.
Ripping Video from the TiVo
Once all the software and hardware is installed, start your web browser and bring up TivoWeb (it’ll be at http://your-TiVo’s-IP-address). You should see something like this:
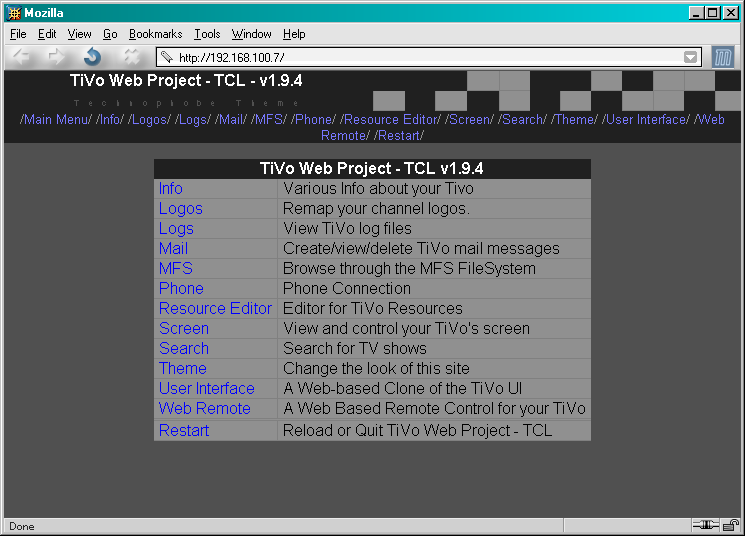
There’s plenty of stuff to fool around with in here (I like to access it remotely through an SSH tunnel to record shows I just heard about), but for now we’ll use it to get stream IDs. Click “User Interface.”
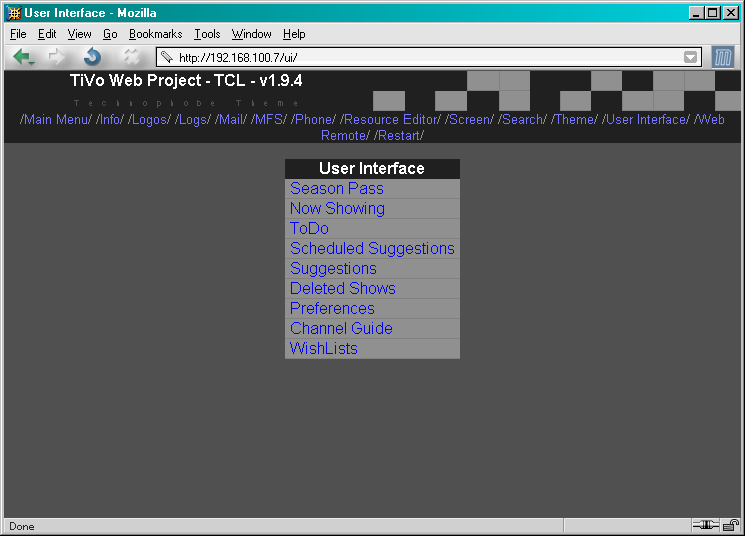
To get a list of what’s currently saved on your TiVo, click “Now Showing.”
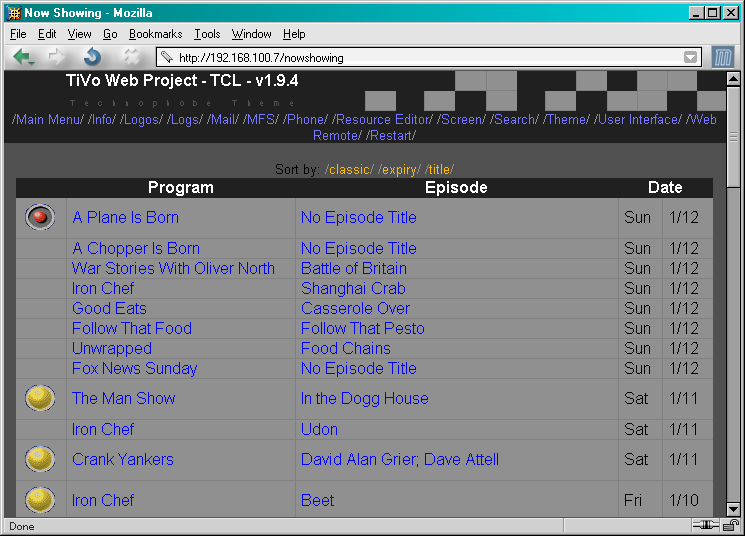
Pick a show and click on its episode name (under the Episode heading, not the Program heading)…it might say “Not an Episode” or “No Episode Title” if it’s not a regular series with named episodes.
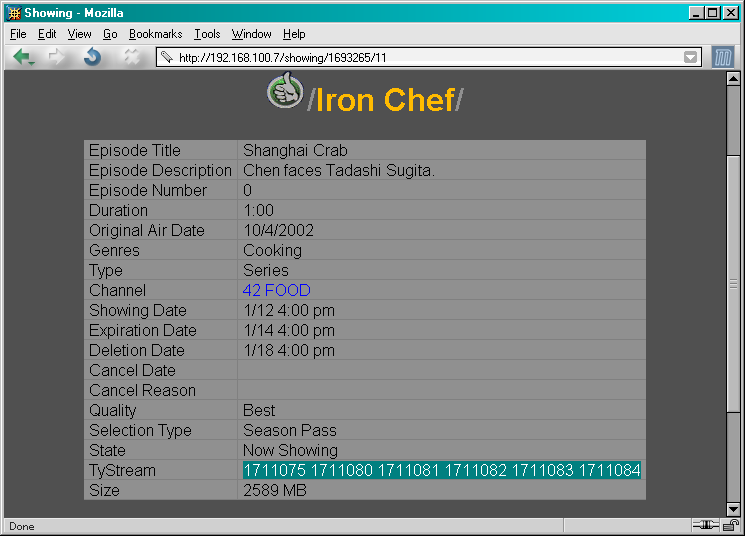
If you scroll down a bit, you’ll see a line marked “TyStream” with a bunch of numbers after it. (I’ve highlighted them in this example.) These are stream IDs that you’ll need to extract this show.
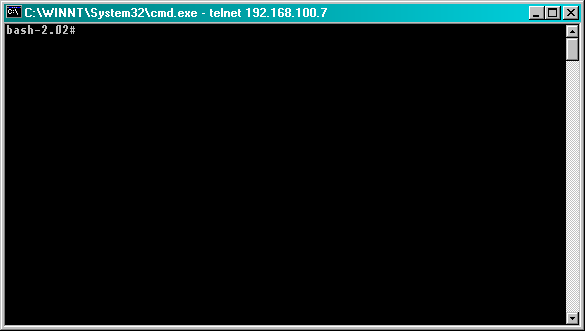
With stream IDs in hand, pop open a couple of command-prompt windows (Start->Run…punch in “cmd” and hit Enter). In one of these, telnet to your TiVo (key in “telnet your-TiVo’s-IP-address” and hit Enter). You should end up at a shell prompt on your TiVo, which looks something like this:
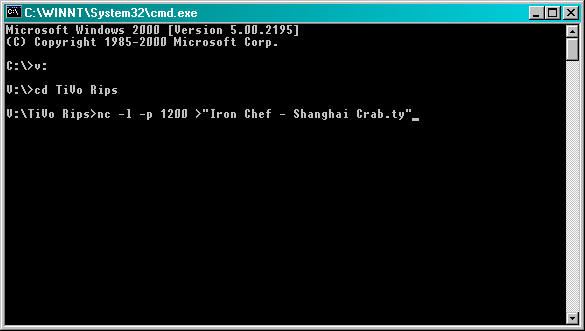
In your other command-prompt window, change to the directory where you want to receive the video. Once you’re there, start nc (that’s short for netcat) with an incantation similar to this:
nc -l -p 1200 >show-name.ty
Press Enter and your computer is ready to receive. This tells nc to listen for incoming traffic on TCP port 1200. We will send the tyStream from the TiVo to this port. “.ty” is the extension for a tyStream. If you want spaces in the filename, you should probably put quotes around it, like this:
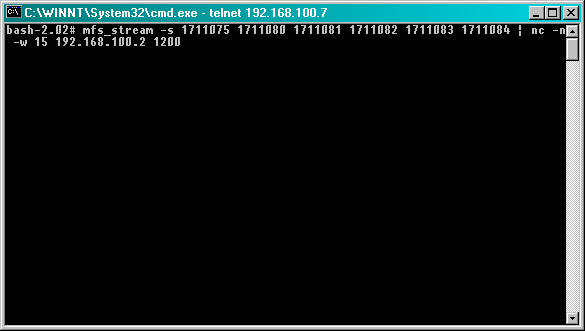
Going back to the first command-prompt window (the telnet session to your TiVo), we will pipe the output of mfs_stream into nc. Use something like this:
mfs_stream -s stream-ids | nc -n -w 15 your-PC's-IP-address 1200
In our example, we’d have something like this:
Hit Enter and the file will start copying from your TiVo to your computer:
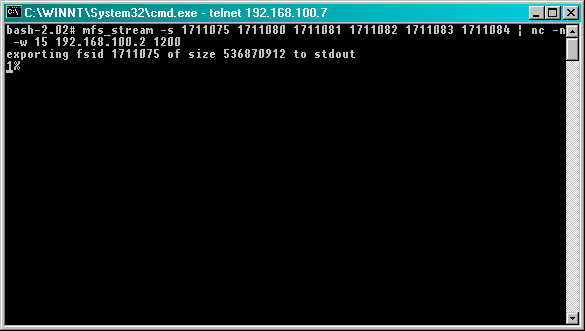
This process will take a while…with best-quality streams through a TiVoNET, it’ll take about as long to send the file as it did to record it. Recording at lower quality and/or using a TurboNET (I really should get one of those :-) ) will speed things up. The completed file will be fairly large…1 hour of best-quality video will take about 2.5-2.6 GB. Since the maximum filesize on a FAT16 or FAT32 partition is 2 GB, you should make sure you extract to an NTFS partition.
Once the process is complete (when the TiVo returns to its “bash-2.02#” prompt and your other command window goes back to its prompt), log out of your TiVo by pressing Control-D. That window should go back to a command prompt. You can close both windows now.
Now that we have a tyStream sitting on your computer, use TyTool to convert the stream file into MPEG video and audio streams. Start TyTool, select “Process File…” from the File menu, find your tyStream, and double-click on it. It should start grinding away at your file:
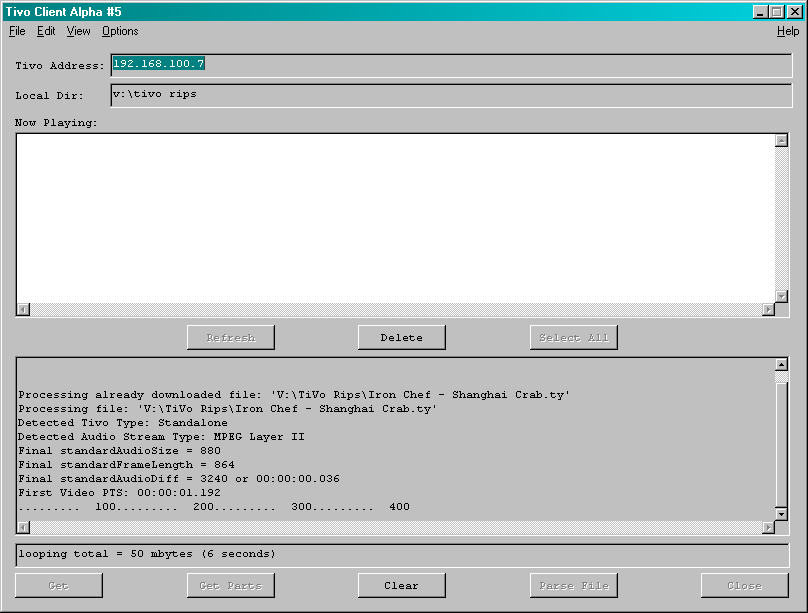
When TyTool is done, close out of it and go to the directory where you stored your tyStream. You should find three new files alongside it:
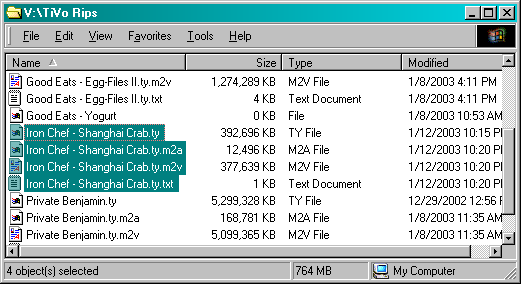
The file with the .m2v extension is an MPEG-2 video stream, the file with the .m2a extension is an MPEG-1 Layer 2 audio stream, and the text file is a log of everything TyTool did to the file. Open the text file in Notepad…toward the end of the text file, there should be a line that looks something like this:
A/V Sync Offset: 0ms (i.e. plays 0ms early!)
Make a note of the first number (which may be positive or negative)…we’ll need it to make the audio and video sync up in the Avisynth script.
Editing Video
Load the .m2v file into DVD2AVI with File->Open. Select File->Save Project and save as show-name.d2v.
Open a command-prompt window, change to the directory where the files are located, and use LAME to convert the .m2a file to a WAV:
lame --mp2input --decode show-name.ty.m2a show-name.wav
You should now have show-name.d2v and show-name.wav. Create a new text file, but name it show-name.avs (Explorer will complain about your changing the extension; ignore it). Open show-name.avs in Notepad and enter this minimal Avisynth script:
vid=MPEG2Source("show-name.d2v")
aud=WAVSource("show-name.wav")
AudioDub(vid,aud)
DelayAudio(audio-delay)
src=ResampleAudio(44100)
src
audio-delay is the number you got from TyTool, divided by 1000 (to convert from milliseconds to seconds). Note that we’re merging the audio and video together, tweaking the audio offset, and upsampling the audio from 32 kHz (what TiVo uses) to 44.1 kHz (what SVCDs use). If you save this file and load show-name.avs into VirtualDub, you should be able to scan around through the file. You could even play show-name.avs with Windows Media Player, but it’ll probably be a bit choppy (even on a fast computer) since Avisynth isn’t optimized for playback.
You’ll probably want to remove ads and other garbage from the show. Delete the last line (the one that just says “src”) from the script, use VirtualDub to find the beginning and end frame numbers of the bits you want to save, and for each clip, add this to your script:
cn=Trim(src,start,end)
where n is a number to identify the clip (I start at 1) and start and end are the frame numbers where the clip starts and ends. You might also want to create a couple of seconds of dead space at the end:
blk=Blackness(src,60)
This creates 60 frames of the same size as the source (60 frames at 30000/1001 fps is about two seconds). Tie all of these cuts together with UnalignedSplice:
UnalignedSplice(c1,c2,...,cn,blk)
If you save the script now and load it into VirtualDub, you should see that only the video you selected is in there.
Since most TV shows are shot on film at 24 fps and telecined to convert them to 30000/1001 fps for broadcast, you end up with lots of redundant video information that you can remove. Inverse telecine reduces the framerate to 24000/1001 fps, which is just a little bit slower than the original (the original was slowed down to 24000/1001 fps when it was telecined). As an added bonus, your video will be deinterlaced. One line at the end of your script will do the trick:
InverseTelecine(40,10,15)
Don’t try changing the numbers…they control how the filter works.
Your finished script should look something like this (the frame numbers are completely made up):
vid=MPEG2Source("show-name.d2v")
aud=WAVSource("show-name.wav")
AudioDub(vid,aud)
DelayAudio(audio-delay)
src=ResampleAudio(44100)
c1=Trim(src,1234,5678)
c2=Trim(src,14565,34532)
c3=Trim(src,39346,52343)
blk=Blackness(src,60)
UnalignedSplice(c1,c2,c3,blk)
InverseTelecine(40,10,15)
If you load the script into VirtualDub now and slowly go from one frame to the next, you should see almost no interlace noise. You might see some for a frame or two occasionally; the inverse-telecine filter is an adaptive filter, so it sometimes needs to adjust how it does its job.
Warning: Not all shows are telecined! If a show was shot with a video camera instead of a movie camera, it was captured at 30000/1001 fps. Anything that’s aired live (news, sports) will be shot this way. Some other genres (soap operas, cooking shows, etc.) are usually shot with video cameras to keep production costs down. If you apply the inverse telecine filter to content that wasn’t telecined, strange things will happen. Remove the filter and be content with 30000/1001 fps interlaced video.
Before closing VirtualDub, get the length of the edited video. You’ll need it to figure the bitrate to use for encoding. Drag the editing slider all the way to the right. The length should be in the status bar.
Encoding to SVCD-Compatible MPEG-2
Use Videohelp’s bitrate calculator to determine what bitrate to use for your encoding; be sure to set SVCD as the media type and fill in the rest of the blanks with appropriate settings. Make note of the average and maximum video bitrates given; you’ll need them in TMPGEnc.
Start TMPGEnc. Before you try loading an Avisynth script into TMPGEnc, you need to disable TMPGEnc’s DirectShow file reader. Select Option->Environmental setting… and click the VFAPI plugin tab. Make sure the DirectShow Multimedia File Reader is unchecked:
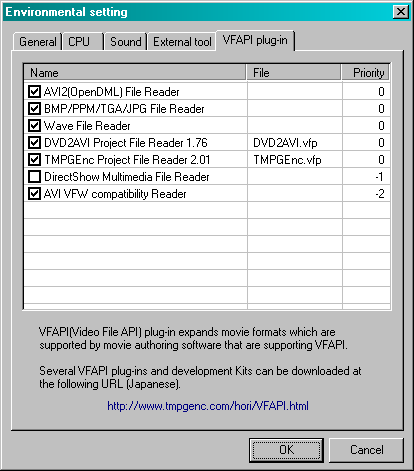
Click OK to save settings.
Click Browse next to the video source box and select show-name.avs, your Avisynth script. The first frame should show up in the preview window. Call the output file whatever you want; TMPGEnc will more than likely suggest show-name.mpg, which will work well enough.
Now we have a ton of options to set to get TMPGEnc to do what we want. Click Setting and go through each of the tabs as follows:
Video
- Stream type: MPEG-2 Video
- Size: 480×480
- Aspect ratio: 4:3 Display
- Frame rate: 23.976 fps (if you used inverse telecine) or 29.97 fps (if you didn’t) (framerates are approximate)
- Rate control mode: 2-pass variable bitrate…click Setting and fill in the average and maximum bitrates as calculated earlier, leave the minimum bitrate at 0, and leave “enable padding” unchecked
- VBV buffer size: 112
- Profile & level: Main Profile & Main Level (MP@ML)
- Video format: NTSC
- Encode mode: 3:2 pulldown when playback (sic) (if you used inverse telecine) or interlace (if you didn’t)
- YUV format: 4:2:0
- DC component precision: 10 bits
- Motion search precision: highest quality (very slow)
Advanced
- Video source type: Non-interlace (progressive) (if you used inverse telecine) or Interlace (if you didn’t use inverse telecine)
- Field order: Top field first (field A) (ignored for progressive sources)
- Source aspect ratio: 4:3 Display
- Video arrange method: Full screen (without any of the “keep aspect ratio” options)
- Don’t check any of the filters.
GOP structure (Group of Pictures, not Grand Old Party :-) )
- Number of I-frames: 1
- Number of P-frames: 5
- Number of B-frames: 2
- Output interval of sequence header: 1
- Output bitstream for edit (closed GOP): unchecked
- Detect scene change: checked
- Force picture type setting: unchecked
Quantize matrix
- Leave the quantization matrices alone unless you know what you’re doing.
- Output YUV data as basic YCbCr: unchecked
- Use floating-point DCT: checked
- No motion search for still picture part by half pixel: unchecked
- Soften block noise: unchecked
Audio
- Stream type: MPEG-1 Audio Layer II
- Sampling frequency: 44100 Hz
- Channel mode: stereo
- Bit rate: whatever you selected (224 kbps recommneded)
- Error protection: checked
- Original flag: unchecked
- Copyright flag: unchecked
- Private flag: unchecked
- Emphasis: none
System
- Stream type: MPEG-2 Super Video CD (VBR)
- Insert comment: optional…I’ve never used it
Once all the options are set, click Start to begin. This will take a long time to run on even fast hardware…my dual Athlon MP 2100 takes about 3 hours (give or take 30 minutes) to encode 45 minutes of video. I have made some choices in encoding options (floating point DCT, for instance) that trade speed for increased quality. You can experiment with other settings if you want, but do at least your first encode with these options so you’ll have a reference to go by as far as what TMPGEnc can do.
If you cut the program somewhere in the middle (needed for more than about 60 minutes of edited video), do the same for the remaining cuts.
Burning the Video to CD
Once TMPGEnc is done, you should have one or more additional MPEG-2 streams that can be played by any program that’ll take MPEG-2 input. These should be somewhere around 800 MB each (for burning to an 80-minute CD-R). Your software DVD player should handle them; there are also MPEG-2 playback codecs that enable Windows Media Player to play MPEG-2 streams. What you really want to do now, though, is burn the stream(s) to one or more CD-Rs so you can put your rip on the shelf next to all your tapes and DVDs. :-)
VCDImager is most easily used with a small batch file that takes care of the program’s Byzantine options. Here’s what I use:
@echo off
vcdimager -t svcd -c %1.cue -b %1.bin -l %2 --volume-count=%3 --volume-number=%4 -p -v %1.mpg
Save this as makesvcd.bat in the directory where your SVCD MPEG-2 streams are stored. To run VCDImager, then, all you type in is this for each image file:
makesvcd outfile label volume-count volume-number
This will convert outfile.mpg into outfile.bin and outfile.cue. The CD will have label as its label (what shows up under the CD’s properties). volume-count should be the number of CDs you will make for this program, while volume-number is the sequence number for this particular CD. Creating the image takes a couple of minutes or so. Once you have the image files, load them into your burning software (FireBurner, Nero, or whatever) and burn to a blank CD-R. You’ll need to use one of the disc-at-once (DAO) modes; track-at-once (TAO) won’t work. Packet-writing software (such as DirectCD or InCD) definitely won’t work.
Conclusion
That’s all there is to it! I’ve been doing this for a little over a year now, and this is the method that I’ve found currently works best for me. Compared to the method I previously published, this one uses much less disk space and runs quite a bit faster. Some people might find the increased reliance on command-line tools and scripts a bit intimidating at first, but they’re really not that big a deal. I think the improved quality and increased performance and flexibility are worth it.
(last edited 23 May 2003)