Category Archives: linux

Cheatsheet: install debloated Windows 11 on QEMU

This pulls together tips from https://christitus.com/windows-11-perfect-install/, https://christitus.com/install-windows-the-arch-linux-way/, https://blogs.oracle.com/virtualization/post/install-microsoft-windows-11-on-virtualbox, and some other sources I’ve forgotten. It’s mainly aimed at getting Win11 running under QEMU on Gentoo Linux, but should also work for bare-metal installs, QEMU on other platforms, or other virtualization platforms (VMware, VirtualBox, etc.).

  1. Verify kernel prerequisites as described in https://wiki.gentoo.org/wiki/QEMU
  2. Install app-emulation/qemu and app-emulation/libvirt
  3. Start /etc/init.d/libvirtd, and add it to the default runlevel:
    sudo rc-update add libvirtd
  4. Add yourself to the kvm group:
    sudo usermod -aG kvm `whoami`
  5. Download the latest Win11 ISO from https://www.microsoft.com/software-download/windows11
  6. Download the latest libvirt driver ISO from https://github.com/virtio-win/virtio-win-pkg-scripts/
  7. Start virt-manager and create a new VM, installing from the Win11 ISO. Most defaults are OK, with the following exceptions:
    a. Change virtual disk storage bus from SATA to virtio
    b. Add new storage, select the driver ISO, and change type from disk to CD-ROM
    c. Change network device type from e100e to virtio
  8. Start the VM; Win11 setup should begin.
  9. Disable TPM and Secure Boot checks in the installer:
    a. When the installer begins, press Shift-F10 and launch regedit from the command prompt.
    b. Add a new key named LabConfig under HKLM\SYSTEM\Setup
    c. Add two new DWORDS to HKLM\SYSTEM\Setup\LabConfig named BypassTPMCheck and BypassSecureBootCheck, and set both to 1.
    d. Exit Regedit, close the command prompt, and continue.
  10. Optional: when prompted during installation, select “English (World)” as the time and currency format. This causes a bunch of bloatware and other crap to not be installed.
  11. After installation on the first boot, press Shift-F10 again and enter this to cut OOBE short:
    oobe\BypassNRO
    This will trigger a reboot, followed by a less intrusive offline OOBE process (necessary because the virtual NIC isn’t working yet, and it’s a good idea anyway).
  12. Once the system’s up and running, run virtio-win-guest-tools.exe from the driver ISO to install the remaining needed drivers and other tools.
  13. If you selected “English (World)” as the time and currency format when installing, start intl.cpl and make sure all settings are as they should be (whether “English (United States)” or whatever’s appropriate for you). Do the same for “region settings” in the Settings app.
  14. Open Microsoft Store, search for “App Installer,” and update it…need to do this for Winget to work. (TODO: is there a way to do this with a normal download instead?)
  15. Open a PowerShell admin window and launch Chris Titus’s tweak utility:
    irm christitus.com/win | iex
    Use it to debloat your system, install the software you want, etc.
    Warning: Removing the Edge browser with this utility may break other apps (I know for certain that Teams won’t work), and it might not be possible to get it working right again without a full reinstall. It appears that Edge is embeddable within applications in much the same way that Internet Explorer was once embeddable. Plus ça change
  16. Check for Windows updates in the usual manner.

More Win11-without-TPM/Secure Boot tricks

https://nerdschalk.com/install-windows-11-without-tpm/ has several methods that might be useful, especially for upgrading from Win10 or earlier (as opposed to the clean install described above).

For upgrading to Win11 22H2 from an earlier version, https://jensd.be/1860/windows/upgrade-to-windows-11-22h2-on-unsupported-hardware should be useful.
Gentoo + Raspberry Pi Pico SDK + VSCodium: getting it all working

The standard instructions for getting the Raspberry Pi Pico SDK up and running mostly work on Gentoo Linux, but there are a few exceptions (especially with regard to setting up the needed ARM cross-compiler). This is a summary of what I figured out over the course of a couple of hours on a Sunday morning, adding the needed components to my system to get the provided “blinky” example to compile without errors. (I don’t yet have a Raspberry Pi Pico to test with, but they’re on order from Sparkfun and will probably arrive sometime this week.)

Install the ARM Cross-Compiler

This is the biggest divergence from the published directions. Gentoo has a system called crossdev that makes building cross-compilers ridiculously easy. If you don’t already have it enabled (I already had AVR, ARM, and RISC-V cross-compilers for other purposes, though the ARM compilers I already had were for cross-compiling for Gentoo on Raspberry Pi SBCs, not the Raspberry Pi Pico), go get it. Even if you’re running Gentoo Linux on a Raspberry Pi SBC, you’ll need this for the Pico:

sudo emerge crossdev

Then, to build the necessary cross-compiler, do this…-s4 ensures that we get a C++ compiler as well as a C compiler:

sudo crossdev -s4 --target arm-none-eabi

Install the Raspberry Pi Pico SDK

This pretty much goes by the book. You’ll need Git installed…if you haven’t done that already, go take care of that. Then, get the SDK:

cd ~ && mkdir pico && cd pico
git clone -b master https://github.com/raspberrypi/pico-sdk
(cd pico-sdk && git submodule update --init)
git clone -b master https://github.com/raspberrypi/pico-examples
git clone -b master https://github.com/raspberrypi/pico-extras
git clone -b master https://github.com/raspberrypi/pico-playground
cat <<EOF >>~/.bashrc
PICO_SDK_PATH=`pwd`/pico-sdk
PICO_EXAMPLES_PATH=`pwd`/pico-examples
PICO_EXTRAS_PATH=`pwd`/pico-extras
PICO_PLAYGROUND_PATH=`pwd`/pico-playground
EOF

Log out and back in before continuing to make sure the new variables are in your environment.

Install VSCodium

VSCodium is the fully-open-source version of Visual Studio Code. Mainly it lacks the telemetry code that phones home to Microsoft with your usage. There is of course an ebuild in Portage, but before we install it, there’s a fix I like to apply that helps with plugin availability (in particular, it gets PlatformIO up and running in VSCodium). The following will do both:

sudo wget https://alfter.us/wp-content/uploads/2022/04/vscodium-marketplace.patch -O /etc/portage/patches/app-editors/vscodium/vscodium-marketplace.patch
sudo emerge vscodium

Configure VSCodium

There are a couple of extensions you’ll want to grab to better integrate Pico SDK projects into VSCodium:

  • C/C++ IntelliSense
  • CMake
  • CMake Tools
  • Cortex-Debug

Try It Out

Start VSCodium from a shell prompt (the needed environment variables may or may not show up if you launch it from some desktop facility). We’ll start with the provided examples:

nohup vscodium ~/pico/pico-examples &

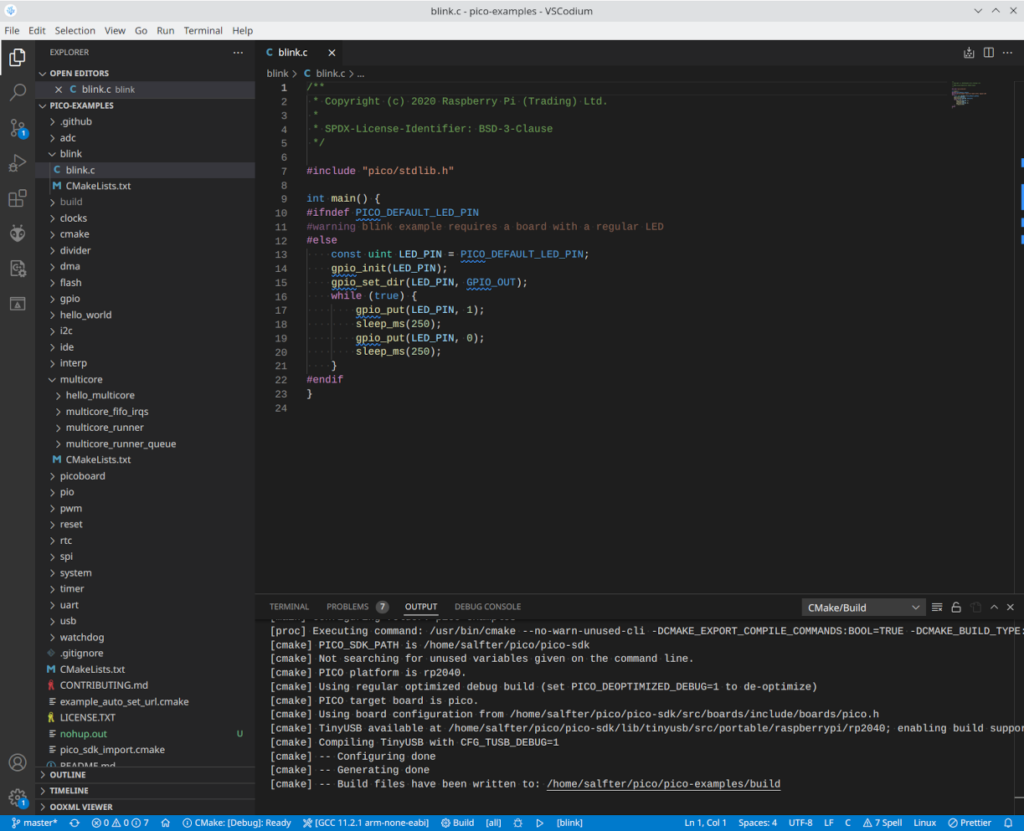
If everything’s set up right, you’ll get some messages from cmake in the output window and a few options to select at the bottom of the window:

Where it says “CMake: [Debug]: Ready,” you can click to choose between different build options: debug, release, etc. To the right of that, you pick the compiler to use…whatever the exact version is, it should have “arm-none-eabi” as part of the name. To the right of that is the “Build” button, and right next to build, you can click where it says “[all]” to pick one of the examples to build. Click on it, select “blink”, then click “Build.” After a short time (maybe a second on the Ryzen 7 3800X I’m running), the output window should say the build is complete with no errors. ~/pico/pico-examples/build/blink/blink.uf2 is the file that you’d then transfer into a Raspberry Pi Pico for execution.

Using Duplicity to back up to Linode Object Storage

I migrated my home server from Gentoo Linux to Flatcar Container Linux a little while back, but hadn’t yet migrated the document backups the old server was making. I was using Duplicity to back up documents to the free space within a Linode VPS, but an increase in the size of the backup set was causing the VPS to run out of disk space. With the new server, I decided to try moving the backups from the VPS to Object Storage. (This is an S3-compatible system, so you can probably adapt these instructions to other S3-compatible storage systems…or to Amazon S3 itself. In figuring this out, I started with example configurations for other S3-compatible services and tweaked where necessary.)

I’m using the wernight/duplicity container to back up files. It needs to be provided two persistent volumes, one for your GnuPG keyring and another for cache. The data to be backed up should also be provided to it as a volume. Access credentials for Linode Object Storage should be stored in an environment file.

To make working with containerized Duplicity more like Duplicity on a non-containerized system, you might wrap it in a shell script like this:

#!/usr/bin/env bash
docker run -it --rm --user 1000 --env-file /mnt/ssd/container-state/duplicity/env -v /mnt/ssd/container-state/duplicity/gnupg:/home/duplicity/.gnupg -v /mnt/ssd/container-state/duplicity/cache:/home/duplicity/.cache/duplicity -v /mnt/storage/files:/mnt/storage/files wernight/duplicity $*

(BTW, if you’re not running a container system, you can invoke an installed copy of Duplicity with the same options taken by this script.)

My server hosts only my files, so running Duplicity with my uid is sufficient. On a multi-user system, you might want to use root (uid 0) instead. Your GnuPG keyring gets mapped to /home/duplicity/.gnupg and persistent cache gets mapped to /home/duplicity/.cache/duplicity. /mnt/storage/files is where the files I want to back up are located.

The zeroth thing you should do, if you don’t already have one, is create a GnuPG key. You can do that here with the script above, which I named duplicity on my server:

./duplicity gpg --generate-key
./duplicity gpg --export-secret-keys -a

FIrst thing you need to do (if you didn’t just create your key above) is to store your GnuPG (or PGP) key with Duplicity. Your backups will be encrypted with it:

./duplicity gpg --import /mnt/storage/files/documents/my_key.asc

Once it’s imported, you should probably set the trust on it to “ultimate,” since it’s your key:

./duplicity gpg --update-trustdb

One last thing we need is your key’s ID…or, more specifically, the last 8 digits of it, as this is how you tell Duplicity what key to use. Take a look at the output of this command:

./duplicity gpg --list-secret-keys

One of these (possibly the only one in there) will be the key you created or imported. It has a 32-digit hexadecimal ID. We need just the last 8 digits. For mine, it’s 92C7689C.

Next, pull up the Linode Manager in your browser and select Object Storage from the menu on the left. Click “Create Bucket” and follow the prompts; make note of the name and the URL associated with the bucket, as we’ll need those later. Switch to the access keys tab and click “Create Access Key.” Give it a label, click “Submit,” and make note of both the access key and secret key that are provided.

Your GPG key’s passphrase and Object Storage access key should be stored in an environment file. Mine’s named /mnt/ssd/container-state/duplicity/env and contains the following:

PASSPHRASE=<gpg-key-passphrase>
AWS_ACCESS_KEY_ID=<object-storage-access-key>
AWS_SECRET_ACCESS_KEY=<object-storage-secret-key>

Now we can run a full backup. Running Duplicity on Linode Object Storage (and maybe other S3-compatible storage) requires the –allow-source-mismatch and –s3-use-new-style options:

./duplicity duplicity --allow-source-mismatch --s3-use-new-style --asynchronous-upload --encrypt-key 92C7689C full /mnt/storage/files/documents s3://us-southeast-1.linodeobjects.com/document-backup

“full” specifies a full backup; replace with “incr” for an incremental backup. Linode normally provides the URL with the bucket name as a subdomain of the server instead of as part of the path; you need to rewrite it from https://bucket-name.server-addr to s3://server-addr/bucket-name.

After sending a full backup, you probably want to delete the previous full backups:

./duplicity duplicity --allow-source-mismatch --s3-use-new-style --asynchronous-upload --encrypt-key 92C7689C --force remove-all-but-n-full 1 s3://us-southeast-1.linodeobjects.com/document-backup

You can make sure your backups are good:

./duplicity duplicity --allow-source-mismatch --s3-use-new-style --asynchronous-upload --encrypt-key 92C7689C verify s3://us-southeast-1.linodeobjects.com/document-backup /mnt/storage/files/documents

Change “verify” to “restore” and you can get your files back if you’ve lost them. Note that restore won’t overwrite a file that exists, so a full restore should be into an empty directory.

Setting up cronjobs (or an equivalent) to do these operations on a regular basis is left as an exercise for the reader. :)

Installing Flatcar Container Linux on Linode

I didn’t see much out there that describes how to set up a Flatcar Container Linux VM at Linode. What follows is what I came up with; it’ll put up a basic system that’s accessible via SSH.

You’ll need a Linux system to prep the installation, as well as about 12 GB of free space. The QEMU-compatible image that is available for download is in qcow2 format; Linode needs a raw-format image. You can download and convert the most recent image as follows (you’ll need QEMU installed, however your distro provides for that):

wget https://stable.release.flatcar-linux.net/amd64-usr/current/flatcar_production_qemu_image.img.bz2 && bunzip2 flatcar_production_qemu_image.img.bz2 && qemu-img convert -f qcow2 -O raw flatcar_production_qemu_image.img tmp.img && mv tmp.img flatcar_production_qemu_image.img && bzip2 -9 flatcar_production_qemu_image.img

You also need a couple of installation tools for Flatcar Container Linux: the installation script and the configuration transpiler. The most recent script is available on GitHub:

wget https://raw.githubusercontent.com/flatcar-linux/init/flatcar-master/bin/flatcar-install -O flatcar-install.sh && chmod +x flatcar-install.sh

So’s the transpiler…you can grab the binary from the releases page. You’ll want to grab the latest ct-v*-x86_64-unknown-linux-gnu and rename it to ct.

Next, we need a configuration script. Here’s a basic YAML file that enables SSH login. You’ll want to substitute your own username and SSH public key for mine. Setting the hostname and timezone to appropriate values for you might also be a good idea. Save this as config.yaml:

passwd:
  users:
    - name: salfter
      groups: 
        - sudo
        - wheel
        - docker # or else Docker won't work
      ssh_authorized_keys:
        - ssh-ed25519 AAAAC3NzaC1lZDI1NTE5AAAAIBJQgbySEtaT8SqZ37tT7S4Z/gZeGH+V5vGZ9i9ELpmU salfter@janeway

etcd:
  # go to https://discovery.etcd.io/new to get a new ID
  discovery: https://discovery.etcd.io/c4e7dd71d5a3eae58b6b5eb45fcba490
  
storage:
  disks:
    - device: /dev/sda
    - device: /dev/sdb
  filesystems:
    - name: "storage"
      mount:
        device: "/dev/sdb"
        format: "ext4"
        label: "storage"
        # wipe_filesystem: true
  directories:
    - filesystem: "storage"
      path: "/docker"
      mode: 0755
    - filesystem: "storage"
      path: "/containerd"
      mode: 0755
    - filesystem: "storage"
      path: "/container-state"
      mode: 0755

  files:
    # set hostname
    - path: /etc/hostname
      filesystem: root
      mode: 0644
      contents: 
        inline: |
          flatcar
    # /etc/resolv.conf needs to be a file, not a symlink
    - path: /etc/resolv.conf
      filesystem: root
      mode: 0644
      contents:
        inline: |

  links:
    # set timezone
    - path: /etc/localtime
      filesystem: root
      overwrite: true
      target: /usr/share/zoneinfo/US/Pacific

systemd:
  units:
    # mount the spinning rust
    - name: mnt-storage.mount
      enabled: true
      contents: |
        [Unit]
        Before=local-fs.target
        [Mount]
        What=/dev/disk/by-label/storage
        Where=/mnt/storage
        Type=ext4
        [Install]
        WantedBy=local-fs.target
    # store containers on spinning rust
    - name: var-lib-docker.mount
      enabled: true
      contents: |
        [Unit]
        Before=local-fs.target
        [Mount]
        What=/mnt/storage/docker
        Where=/var/lib/docker
        Type=none
        Options=bind
        [Install]
        WantedBy=local-fs.target
    - name: var-lib-containerd.mount
      enabled: true
      contents: |
        [Unit]
        Before=local-fs.target
        [Mount]
        What=/mnt/storage/containerd
        Where=/var/lib/containerd
        Type=none
        Options=bind
        [Install]
        WantedBy=local-fs.target
    # Ensure docker starts automatically instead of being socket-activated
    - name: docker.socket
      enabled: false
    - name: docker.service
      enabled: true

docker:

Use ct to compile config.yaml to config.json, which is what the Flatcar installer will use:

./ct --in-file config.yaml >config.json

Now it’s time to set up a new Linode. Get whatever size you want. Set it up with any available distro; we’re not going to use it. (I initially intended to leave a small Alpine Linux configuration up to bootstrap and update the system, but you really don’t need it. Uploading and installation can be done with the Finnix rescue system Linode provides.) Shut down the new host, delete both the root and swap filesystems disks that Linode creates, and create two new ones: a 10-GB Flatcar boot disk and a data disk that uses the rest of your available space. Configure the boot disk as /dev/sda and the data disk as /dev/sdb.

Reboot the node in rescue mode. This will (as of this writing, at least) bring it up in Finnix from a CD image. Launch the Lish console and enable SSH login:

passwd root && systemctl start sshd && ifconfig

Mount the storage partition so we can upload to it:

mkdir /mnt/storage && mount /dev/sdb /mnt/storage && mkdir /mnt/storage/install

Make note of the node’s IP address; you’ll need it. I’ll use 12.34.56.78 as an example below.

Back on your computer, upload the needed files to the node…it’ll take a few minutes:

scp config.json flatcar-install.sh flatcar_production_qemu_image.img.bz2 root@12.34.56.78:/mnt/storage/install/

Back at the node, begin the installation…it’ll take a few more minutes:

./flatcar-install.sh -f flatcar_production_qemu_image.img.bz2 -d /dev/sda -i config.json

Once the installation is complete, shut down the node. In the Linode Manager page for your node, go to the Configurations tab and edit the configuration. For “Select a Kernel” under “Boot Settings,” change from the default “GRUB 2” to “Direct Disk.” /dev/sda is a hard-drive image, not a filesystem image; this will tell Linode to run the MBR on /dev/sda, which will start the provided GRUB and load the kernel.

Now, you can bring up your new Flatcar node. If you still have the console window up, you should see that it doesn’t take long at all to boot…maybe 15 seconds or so once it gets going. Once it’s up, you can SSH in with the key you configured.

From here, you can reconfigure more or less like any other Flatcar installation. If you need to redo the configuration, probably the easiest way to do that is to upload your config.json to /usr/share/oem/config.ign, touch /boot/flatcar/first_boot, and reboot. This will reread the configuration, which is useful for adding new containers, creating a persistent SSH configuration, etc.

Connecting to Bluetooth serial devices on Gentoo LInux

This should’ve been easier, but in hindsight it isn’t too bad. The point-and-drool tools provided for managing Bluetooth (at least under KDE) fall flat on their face, but if you enable some supposedly deprecated options and rebuild BlueZ, you’ll get what you need.

I decided to try getting an HC-05 Bluetooth interface working with one of my 3D printers yesterday. bluedevil (the KDE package that manages Bluetooth) apparently knows nothing about RFCOMM devices (which emulate RS-232 connections over Bluetooth). I had gotten both Android and Windows 10 to talk to my printer over Bluetooth without much fuss: pair the device, fire up a suitable application, and connect.

The needed documentation to get RFCOMM devices working on recent Gentoo builds is a bit sparse, so this post aims to correct that.

First, BlueZ needs to be rebuilt with some more USE flags enabled:

echo net-wireless/bluez deprecated extra-tools readline | sudo tee /etc/portage/package.use/bluez && sudo emerge -1v bluez && sudo /etc/init.d/bluetooth restart

With your HC-05 at least powered up, you can retrieve its MAC address, which is needed for the following step:

hcitool scan

which returns something like this:

Scanning ...
        98:D3:32:10:F7:9C       HC-05

Next, RFCOMM needs to be configured and BlueZ restarted (wherever you see it below, substitute your device’s MAC address for the one used here):

cat <<EOF | sudo tee /etc/bluetooth/rfcomm.conf && sudo /etc/init.d/bluetooth restart
rfcomm {
  bind no;
  device 98:D3:32:10:F7:9C;
  channel 1;
}
EOF

Now we can pair the device to the computer:

sudo rfcomm connect hci0 98:D3:32:10:F7:9C 1

You should be prompted for the HC-05’s PIN; the default is 1234. (Note: while I’ve gotten this working under KDE, I never get prompted for the PIN when in a pure-CLI environment and the connection is refused.) Key it in, and you should get a notice that you’re now connected:

Connected /dev/rfcomm0 to 98:D3:32:10:F7:9C on channel 1
Press CTRL-C for hangup

Press Ctrl-C, then store the PIN for future reference:

for i in /var/lib/bluetooth/[0-9A-F]*; do echo 98:D3:32:10:F7:9C 1234 | sudo tee -a $i/pincodes; done

Create a boot script to bind /dev/rfcomm0:

cat <<EOF | sudo tee /etc/local.d/01-rfcomm-bind.start && sudo chmod +x /etc/local.d/01-rfcomm-bind.start
#!/usr/bin/env bash
rfcomm bind hci0 98:D3:32:10:F7:9C 1
EOF

Run rc-update and verify that both bluetooth and local are both being launched; in my case, both are in the default runlevel. If you reboot now, /dev/rfcomm0 should show up. Use something like minicom to connect, and if your HC-05 is plugged into a printer and the UART interface it’s using is active, you should at least see garbage coming across the line. The HC-05 defaults to 9600 bps, while your printer is probably at 115.2 kbps or faster. The only method I know of to set a different bitrate is to plug it in through an Arduino to bring up the AT-command interface, as described here. It doesn’t seem to support nonstandard speeds like 250 kbps and multiples thereof, and I even had trouble getting 230.4 kbps to work. 115.2 kbps has usually been fast enough to stream gcode without stalling; preprocessing your gcode with something like ArcWelder may help if your printer is running reasonably modern firmware.

Gentoo Linux, HPLIP, and the HP LaserJet 1320 don’t mix

If you try following the advice at the Gentoo Wiki, you would install HPLIP and use its hp-setup utility to add the printer to your system.  That way, however, lies madness…and printer communication errors.  I think this was the previous source of errors when I was using a JetDirect 175x between the computer and printer, but it’s not behaving any better with a direct USB connection.

Here’s what I ended up doing to get my printer working:

  1. emerge -C hplip && emerge foomatic-db-engine && /etc/init.d/cupsd restart
  2. Make sure USB printing support (CONFIG_USB_PRINTER) is enabled in the kernel…note that genkernel builds a kernel without it!
  3. Generate a PPD:
    foomatic-ppdfile -p `foomatic-searchprinter "HP LaserJet 1320"` >lj1320.ppd
  4. Go into the CUPS web interface and add the printer.  It should show up as a USB device.  When the option comes up to provide CUPS a PPD file, take it and use the file generated in the previous step.
  5. Once set up, double-check the printer default options to make sure the right paper size is selected.  (I think this method defaults to letter, but HPLIP used A4 as the default.  Either way, make sure it’s correct for what you’re using.)

Figuring all that out was three hours I won’t get back due to either buggy software (it wasn’t this tricky to get running on Kubuntu) or inadequate documentation.  At least now it’s written down to save others the aggravation.

Using Greyhole on Gentoo Linux just got easier

For a while, I was running Ubuntu Server instead of Gentoo on my home file server because I had some trouble figuring out how to get Greyhole running on it.

(Background: Greyhole is a redundant-storage subsystem that sits on top of Samba.  Basically, it allows you to combine multiple disks (not necessarily all the same size) into one pool of storage space.  If you have files you really don’t want to lose (like your wedding photos…but you should have backups!), you can tell it to maintain copies of those files on more than one drive…think of it as selective redundancy.  It’s been compared to the Drive Extender feature that used to be in Windows Home Server, but I don’t think Drive Extender provided redundant storage.)

Anyway, a desire to get my home server running Gentoo again prodded another attempt at getting Greyhole working on it.  A couple of weeks or so ago, I figured it out…but it was a manual process, and since it requires a loadable module to be built within the Samba source tree, it wasn’t going to be easily maintainable.

The solution to this?  Write an ebuild.  The peculiarities of getting Greyhole up and running made this a bit more tricky than usual, but I’ve done it:

https://github.com/salfter/portage/tree/master/net-fs/greyhole

This is part of my Portage overlay, which has a bunch of other ebuilds I’ve found useful over the years.  Installing Greyhole on Gentoo is now as simple as this:

  • add http://salfter.github.com/layman.xml to your overlays in /etc/layman/layman.cfg
  • layman -S && layman -a salfter to pull in the overlay
  • emerge greyhole to install
  • configure & enjoy!

One caveat: the Greyhole ebuild will currently only with with Samba 3.x.  The build process for Samba 4.x is a little bit different, and since I don’t have a Gentoo box running Samba 4 (it’s keyworded ~arch at this time), I don’t have a way to verify that it’ll work.  There are three FIXMEs that would need to be replaced to use Greyhole with Samba 4.x.)

Don’t cross the streams!

Surely a sign of TEOTWAWKI:

Bill Gates Inadvertently Shows Off Ubuntu on His Facebook Page

Screencapped, in case it goes down the memory hole:

bgates_ubuntu_fb_screencap

(Yes, the likely explanation is that he pulled a stock photo from somewhere, but you’d think he, of all people, would’ve spent a few minutes extra to find a stock photo with a Windows desktop.  Hell, he could’ve called someone in Microsoft’s PR department to either find an image or have one made on short order.)

Linux 3.17 is out, and some of my code is in it

It’s not the first time that happened…submitted a couple of drivers for a video-capture card we built at my previous job back around ’05 or ’06.

https://git.kernel.org/cgit/linux/kernel/git/torvalds/linux.git/tree/drivers/w1/slaves/w1_ds2406.c?id=refs/tags/v3.17

I submitted this a few months ago for my Raspberry Pi beer-fridge controller. I picked the parts and put it together without checking to see first if the necessary driver support was already in place…derp! Fortunately, it’s relatively easy to correct such deficiencies when you have source-code access to the whole system.