Category Archives: Windows

Run Windows apps in a browser with Wine and Docker

ProMash is a program I’ve used to manage beer recipes for over 20 years. There was only ever a Windows version published, but I mostly ran it under Linux with Wine. I had the entire program directory (with recipes, brewing sessions, etc.) checked into checked into Git so I could pull it down on whatever computer I was using at the time and run it.

A while back, I Dockerized my home server. One of the neat tricks I found it could do was run graphical Linux apps through a web browser: Calibre, Picard, etc. I then got the idea to try containerizing ProMash. It can run under Wine and Wine runs under Linux, so it should work…right?

Turns out it works pretty well. Start with this Dockerfile, which adds Wine to the linuxserver.io base image and adds the program to be run:

FROM ghcr.io/linuxserver/baseimage-selkies:arch
RUN pacman -Syu || true && pacman -S --noconfirm wine wine-gecko && yes | pacman -Scc
ADD --chown=911:911 . /config/promash
COPY /root /

For an app that doesn’t need to be installed (just run from a random directory), it’s enough to just make it visible within the container and add a config file to tell the container to launch it. First, docker-compose.yml:

services:
  promash:
    build: .
    container_name: promash
    restart: unless-stopped
    environment:
      CUSTOM_PORT: 8080
      CUSTOM_HTTPS_PORT: 8081
    networks:
      - www
    volumes:
      - promash-data:/config/promash
    labels:
      caddy: promash.alfter.us
      #caddy.basic_auth.salfter: "$PASSWD"
      caddy.import: secure *
      caddy.reverse_proxy: promash.www:8080
      caddy.log.output: discard
          
networks:
  www:
    name: www
    external: true    
    
volumes:
  promash-data:
    name: promash-data
    external: true

This is set up to use caddy-docker-proxy and to control access to ProMash with an Authelia SSO instance (caddy.import: secure *), but these are easily replaced with whatever proxy option you prefer. The ProMash directory within the container gets written out to a named volume so my changes don’t get lost and my recipes are easily backed up.

One more file is needed to tell the container how to launch your program. root/defaults/autostart should look something like this:

(cd /config/promash && wine ProMash.exe)

These three files were added to my ProMash repo, which was then checked out onto my home server and launched. This is what it looks like in the browser:
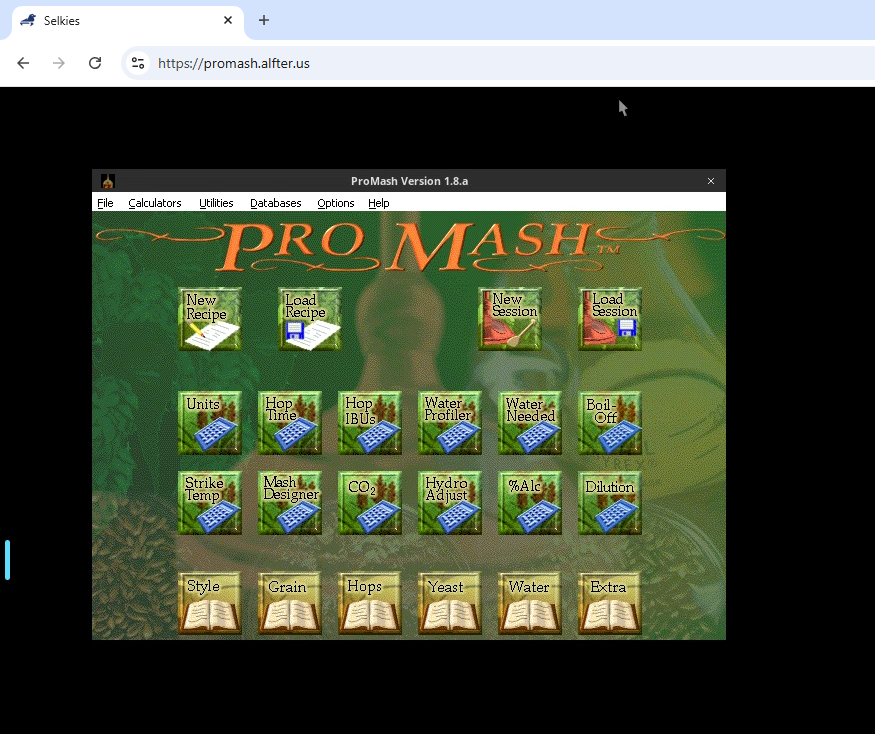
This should be adaptable to any Windows app that will run under Wine (which is an ever-increasing percentage of them). Programs that need to be installed would be a bit trickier to get running, but it should still be possible to get them running.

Cheatsheet: install debloated Windows 11 on QEMU

This pulls together tips from https://christitus.com/windows-11-perfect-install/, https://christitus.com/install-windows-the-arch-linux-way/, https://blogs.oracle.com/virtualization/post/install-microsoft-windows-11-on-virtualbox, and some other sources I’ve forgotten. It’s mainly aimed at getting Win11 running under QEMU on Gentoo Linux, but should also work for bare-metal installs, QEMU on other platforms, or other virtualization platforms (VMware, VirtualBox, etc.).

  1. Verify kernel prerequisites as described in https://wiki.gentoo.org/wiki/QEMU
  2. Install app-emulation/qemu and app-emulation/libvirt
  3. Start /etc/init.d/libvirtd, and add it to the default runlevel:
    sudo rc-update add libvirtd
  4. Add yourself to the kvm group:
    sudo usermod -aG kvm `whoami`
  5. Download the latest Win11 ISO from https://www.microsoft.com/software-download/windows11
  6. Download the latest libvirt driver ISO from https://github.com/virtio-win/virtio-win-pkg-scripts/
  7. Start virt-manager and create a new VM, installing from the Win11 ISO. Most defaults are OK, with the following exceptions:
    a. Change virtual disk storage bus from SATA to virtio
    b. Add new storage, select the driver ISO, and change type from disk to CD-ROM
    c. Change network device type from e100e to virtio
  8. Start the VM; Win11 setup should begin.
  9. Disable TPM and Secure Boot checks in the installer:
    a. When the installer begins, press Shift-F10 and launch regedit from the command prompt.
    b. Add a new key named LabConfig under HKLM\SYSTEM\Setup
    c. Add two new DWORDS to HKLM\SYSTEM\Setup\LabConfig named BypassTPMCheck and BypassSecureBootCheck, and set both to 1.
    d. Exit Regedit, close the command prompt, and continue.
  10. Optional: when prompted during installation, select “English (World)” as the time and currency format. This causes a bunch of bloatware and other crap to not be installed.
  11. After installation on the first boot, press Shift-F10 again and enter this to cut OOBE short:
    oobe\BypassNRO
    This will trigger a reboot, followed by a less intrusive offline OOBE process (necessary because the virtual NIC isn’t working yet, and it’s a good idea anyway).
  12. Once the system’s up and running, run virtio-win-guest-tools.exe from the driver ISO to install the remaining needed drivers and other tools.
  13. If you selected “English (World)” as the time and currency format when installing, start intl.cpl and make sure all settings are as they should be (whether “English (United States)” or whatever’s appropriate for you). Do the same for “region settings” in the Settings app.
  14. Open Microsoft Store, search for “App Installer,” and update it…need to do this for Winget to work. (TODO: is there a way to do this with a normal download instead?)
  15. Open a PowerShell admin window and launch Chris Titus’s tweak utility:
    irm christitus.com/win | iex
    Use it to debloat your system, install the software you want, etc.
    Warning: Removing the Edge browser with this utility may break other apps (I know for certain that Teams won’t work), and it might not be possible to get it working right again without a full reinstall. It appears that Edge is embeddable within applications in much the same way that Internet Explorer was once embeddable. Plus ça change
  16. Check for Windows updates in the usual manner.

More Win11-without-TPM/Secure Boot tricks

https://nerdschalk.com/install-windows-11-without-tpm/ has several methods that might be useful, especially for upgrading from Win10 or earlier (as opposed to the clean install described above).

For upgrading to Win11 22H2 from an earlier version, https://jensd.be/1860/windows/upgrade-to-windows-11-22h2-on-unsupported-hardware should be useful.