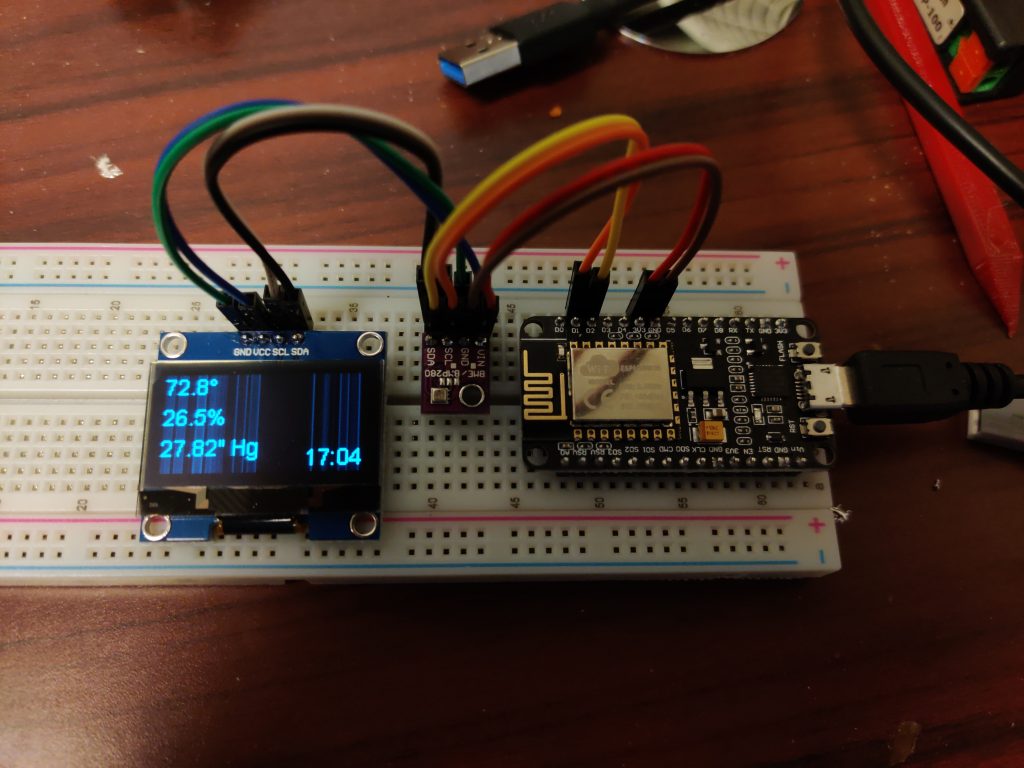
I’ve been playing around a bit with ESPHome and Home Assistant lately…started with a couple of Sonoff smart outlets, one to replace a Kill-A-Watt monitoring my mining rig and another to switch a light on at sunset.
What’s up above is part of this weather station kit. The metal can on the small board in the center is a BME280 environmental sensor that picks up temperature, humidity, and barometric pressure and makes that information available over I2C. The NodeMCU on the right reads the sensor, publishes its readings over WiFi to a Home Assistant server, and displays the readings (and current time) on the I2C-connected OLED on the left. You could probably use an ESP-01S with a 4-MB flash upgrade since I2C only needs two pins to work, but the kit came with a NodeMCU, so that’s how I brought it up initially.
Wiring is simple: connect ground together on all three boards, connect the power inputs on the OLED and sensor to a 3.3V pin on the NodeMCU, connect the data pins (SDA) to pin D2, and connect the clock pins (SCK) to pin D1.
The ESPHome config file (not really a program as such) looks something like this:
esphome:
  name: bme280
  platform: ESP8266
  board: nodemcuv2

wifi:
  ssid: "your_wifi_ssid"
  password: "your_wifi_password"

# Enable logging
logger:

# Enable Home Assistant API
api:

ota:

i2c:

sensor:
  - platform: bme280
    address: 0x76
    temperature:
      name: "BME280 Temperature"
      id: temp
      oversampling: 16x
    pressure:
      name: "BME280 Pressure"
      id: baro
    humidity:
      name: "BME280 Humidity"
      id: humid
    update_interval: 60s

display:
  - platform: ssd1306_i2c
    model: "SH1106 128x64"
    lambda: |-
      it.strftime(127, 60, id(arial14), TextAlign::BASELINE_RIGHT, "%H:%M", id(esptime).now());
      it.printf(0, 0, id(arial14), TextAlign::TOP_LEFT, "%.1f°", id(temp).state*1.8+32.0);
      it.printf(0, 20, id(arial14), TextAlign::TOP_LEFT, "%.1f%%", id(humid).state);
      it.printf(0, 40, id(arial14), TextAlign::TOP_LEFT, "%.2f\" Hg", id(baro).state*0.0295);

time:
  - platform: homeassistant
    id: esptime

font:
  - file: "/usr/share/fonts/corefonts/arial.ttf"
    id: arial14
    size: 14
The sensor returns temperature in °C and barometric pressure in hPa; the code above converts those to more sensible units for display. Also, you’ll probably need to update the font file location to whatever is correct for your system. (I have ESPHome installed on Gentoo Linux and have the corefonts package installed.)
Something like this would be useful to have indoors. For an outdoors weather sensor, leave off the screen and the related sections (display, time, and font) from the config file. Next task is to fab up an enclosure of some sort.