
Fuck Joe Biden.
Fuck Joe Biden.
I heard it takes AOC an hour and a half to watch 60 Minutes.
Fuck Joe Biden.
I don’t think I’ve seen Democrats this pissed off since we took their slaves away.
That is all.
Fuck Joe Biden.
…if far-left prosecutors refuse to do their jobs and prosecute violations?
If George Gascon had done his job and put this punk away on a third strike for felon-in-possession, we wouldn’t have gotten to this point. He didn’t, though, so this is what happened. Those cops’ blood is on George Gascon’s hands, just as much as the punk who pulled the trigger. Worthless cunt.
Fuck Joe Biden.

Fuck Joe Biden.

…and in not entirely unrelated news, I think it’s time to borrow a page from Cato the Elder, who was famous for ending every speech with Carthago delenda est, and pick a message appropriate for our times with which to end every post. I’ve got it:
Fuck Joe Biden.


The senile sundowning shithead thinks his restrictions on 80% lower receivers will make a lick of difference. Reality would beg to differ, as it’s already gotten ahead of him. Not only have lower receivers been almost entirely 3D-printable for some time (with equipment that only costs a couple hundred dollars or so), but the folks behind the Ghost Gunner desktop CNC mill just announced a path to using one of their machines to mill a receiver from a few chunks of raw aluminum.
Free men don’t ask permission.
Fuck Joe Biden.
The standard instructions for getting the Raspberry Pi Pico SDK up and running mostly work on Gentoo Linux, but there are a few exceptions (especially with regard to setting up the needed ARM cross-compiler). This is a summary of what I figured out over the course of a couple of hours on a Sunday morning, adding the needed components to my system to get the provided “blinky” example to compile without errors. (I don’t yet have a Raspberry Pi Pico to test with, but they’re on order from Sparkfun and will probably arrive sometime this week.)
This is the biggest divergence from the published directions. Gentoo has a system called crossdev that makes building cross-compilers ridiculously easy. If you don’t already have it enabled (I already had AVR, ARM, and RISC-V cross-compilers for other purposes, though the ARM compilers I already had were for cross-compiling for Gentoo on Raspberry Pi SBCs, not the Raspberry Pi Pico), go get it. Even if you’re running Gentoo Linux on a Raspberry Pi SBC, you’ll need this for the Pico:
sudo emerge crossdevThen, to build the necessary cross-compiler, do this…-s4 ensures that we get a C++ compiler as well as a C compiler:
sudo crossdev -s4 --target arm-none-eabiThis pretty much goes by the book. You’ll need Git installed…if you haven’t done that already, go take care of that. Then, get the SDK:
cd ~ && mkdir pico && cd pico
git clone -b master https://github.com/raspberrypi/pico-sdk
(cd pico-sdk && git submodule update --init)
git clone -b master https://github.com/raspberrypi/pico-examples
git clone -b master https://github.com/raspberrypi/pico-extras
git clone -b master https://github.com/raspberrypi/pico-playground
cat <<EOF >>~/.bashrc
PICO_SDK_PATH=`pwd`/pico-sdk
PICO_EXAMPLES_PATH=`pwd`/pico-examples
PICO_EXTRAS_PATH=`pwd`/pico-extras
PICO_PLAYGROUND_PATH=`pwd`/pico-playground
EOF
Log out and back in before continuing to make sure the new variables are in your environment.
VSCodium is the fully-open-source version of Visual Studio Code. Mainly it lacks the telemetry code that phones home to Microsoft with your usage. There is of course an ebuild in Portage, but before we install it, there’s a fix I like to apply that helps with plugin availability (in particular, it gets PlatformIO up and running in VSCodium). The following will do both:
sudo wget https://alfter.us/wp-content/uploads/2022/04/vscodium-marketplace.patch -O /etc/portage/patches/app-editors/vscodium/vscodium-marketplace.patch
sudo emerge vscodiumThere are a couple of extensions you’ll want to grab to better integrate Pico SDK projects into VSCodium:
Start VSCodium from a shell prompt (the needed environment variables may or may not show up if you launch it from some desktop facility). We’ll start with the provided examples:
nohup vscodium ~/pico/pico-examples &If everything’s set up right, you’ll get some messages from cmake in the output window and a few options to select at the bottom of the window:
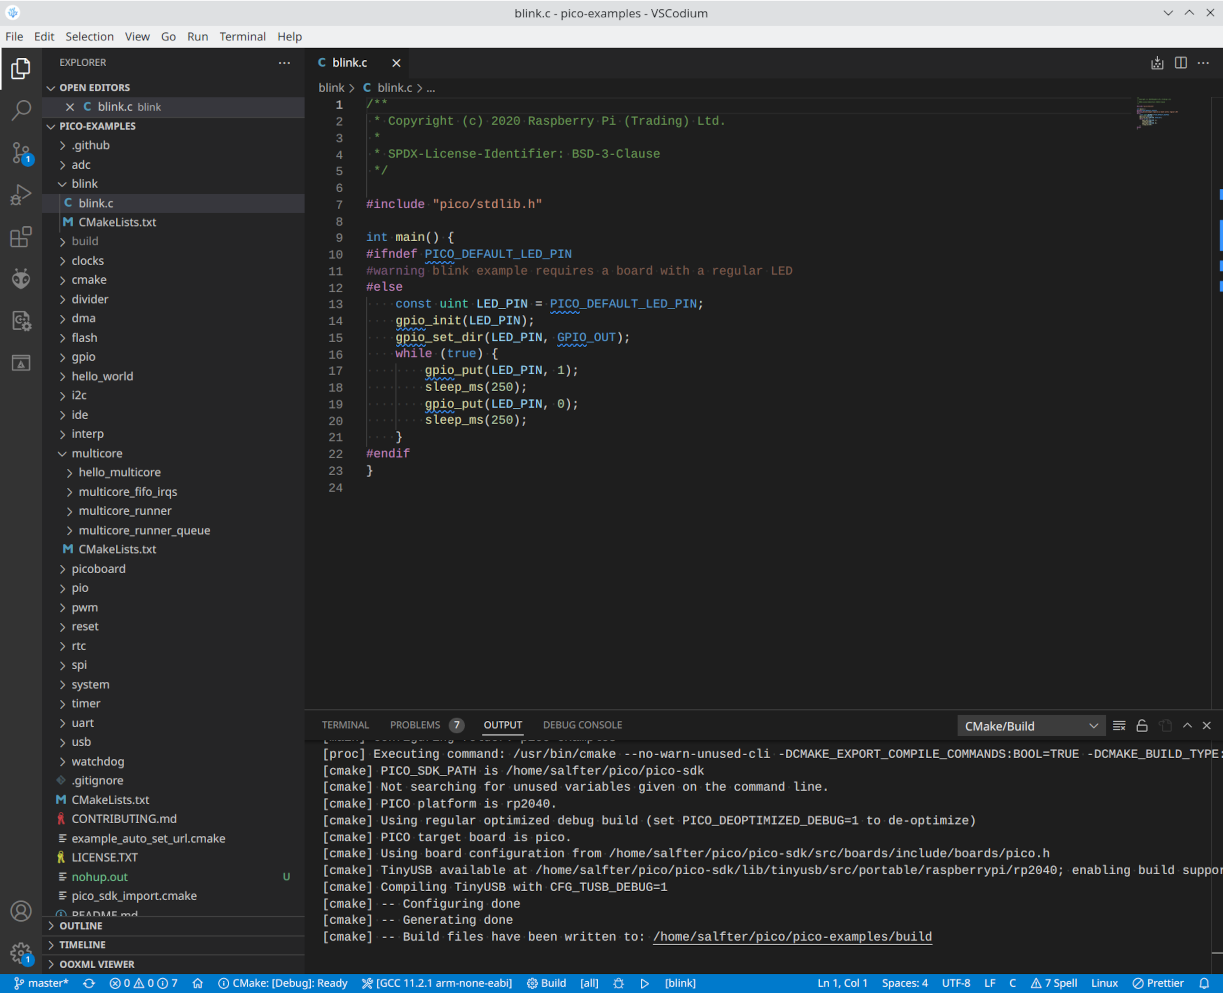
Where it says “CMake: [Debug]: Ready,” you can click to choose between different build options: debug, release, etc. To the right of that, you pick the compiler to use…whatever the exact version is, it should have “arm-none-eabi” as part of the name. To the right of that is the “Build” button, and right next to build, you can click where it says “[all]” to pick one of the examples to build. Click on it, select “blink”, then click “Build.” After a short time (maybe a second on the Ryzen 7 3800X I’m running), the output window should say the build is complete with no errors. ~/pico/pico-examples/build/blink/blink.uf2 is the file that you’d then transfer into a Raspberry Pi Pico for execution.