
“LKW-Fahrer sind unser Unglück.”
“LKW-Fahrer sind unser Unglück.”

Today is Everybody Blog About Mass Formation Psychosis Day, in case you haven’t heard.
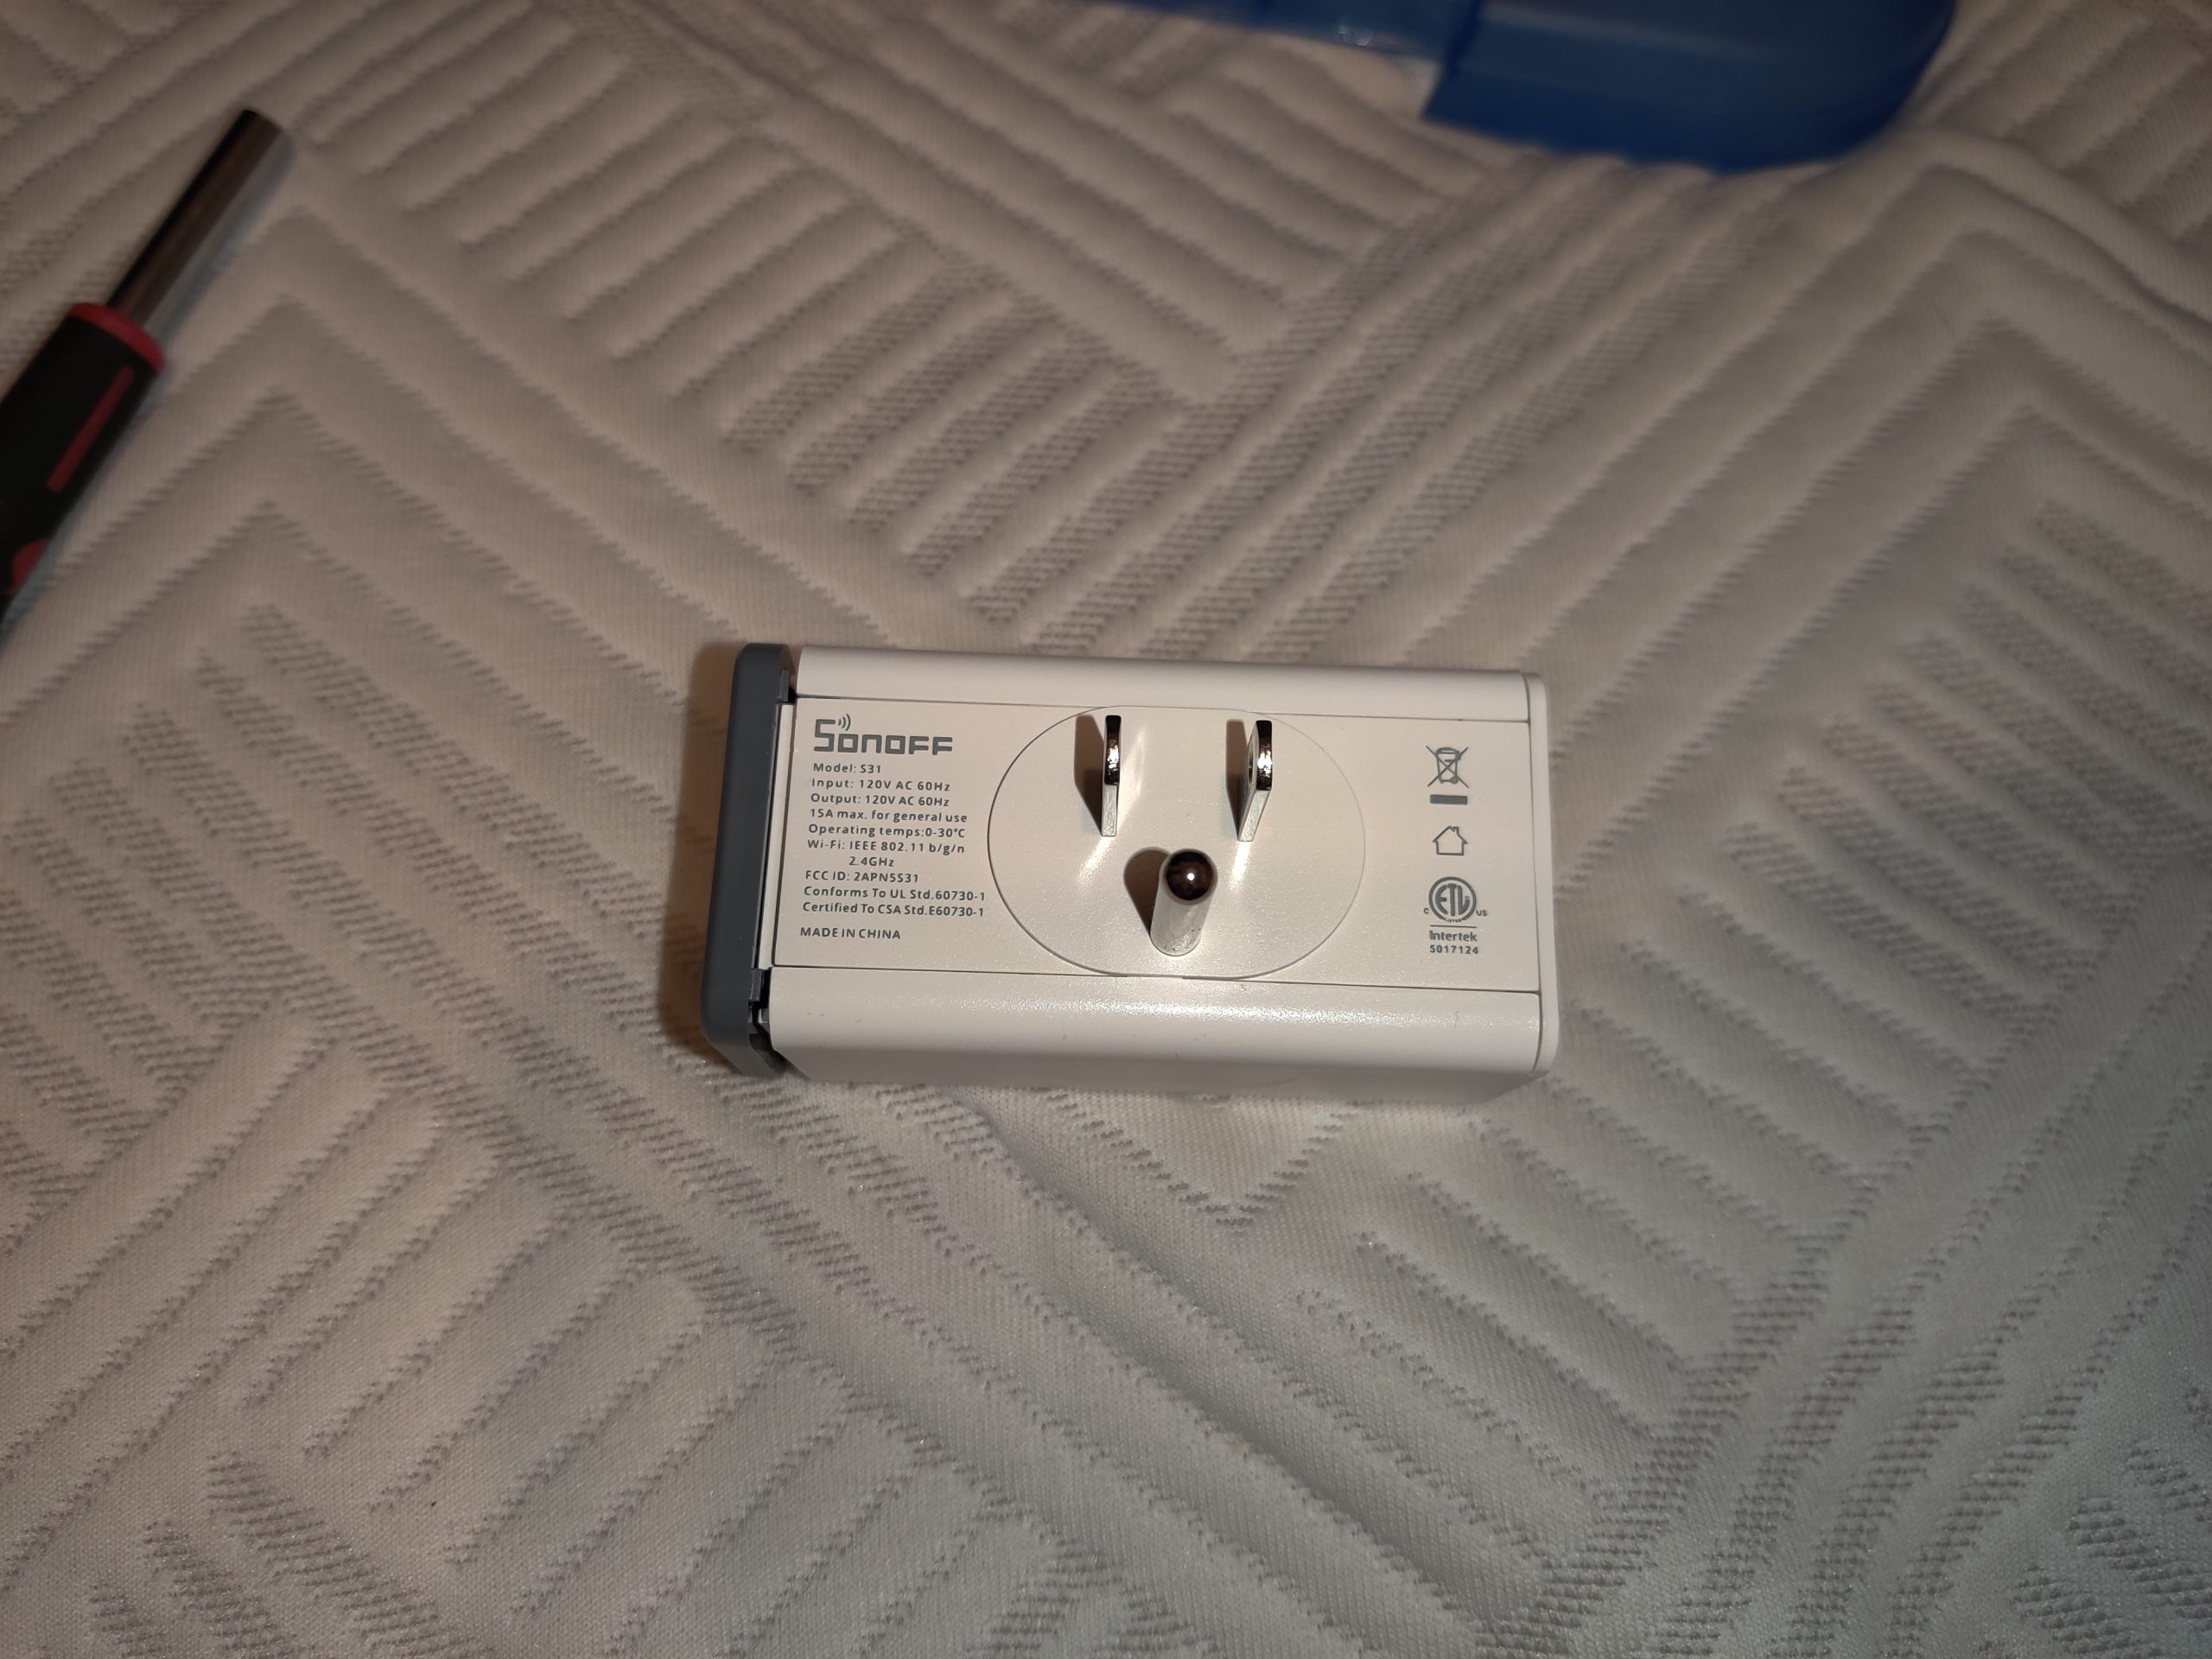
The Sonoff S31 is an inexpensive WiFi-controlled switched outlet. Out of the box, the preloaded firmware ties it into various cloud services, but since it’s basically an ESP8266, a relay, and a small handful of other parts, it’s fairly easy to drop ESPHome (or other open-source firmware) onto the S31 so that it doesn’t phone home every time you use it to switch your coffee maker on and off.
Once ESPHome is on the S31, future updates are carried out over WiFi. The initial installation, however, must be done over a serial connection with the device opened up. This, however, is easy…and since it’s done with the S31 unplugged, no dangerous voltages will be present.
You’ll need a few things:
Software-wise, I’ll assume that you’re running Linux. You can have ESPHome installed on your computer however your distro provides, or you can run the Docker container that’s available. Since containers are distro-independent, I’ll follow that route when we get to it.
First, we need to disassemble the S31. The gray cap on the end with the power button can be pried off with your thumbnail, spudger, guitar pick, or similar implement. There’s usually a small gap on the back to facilitate this…the picture shows the cap loosened:
With the cap off, there are two trim strips that slide out to reveal three screws:
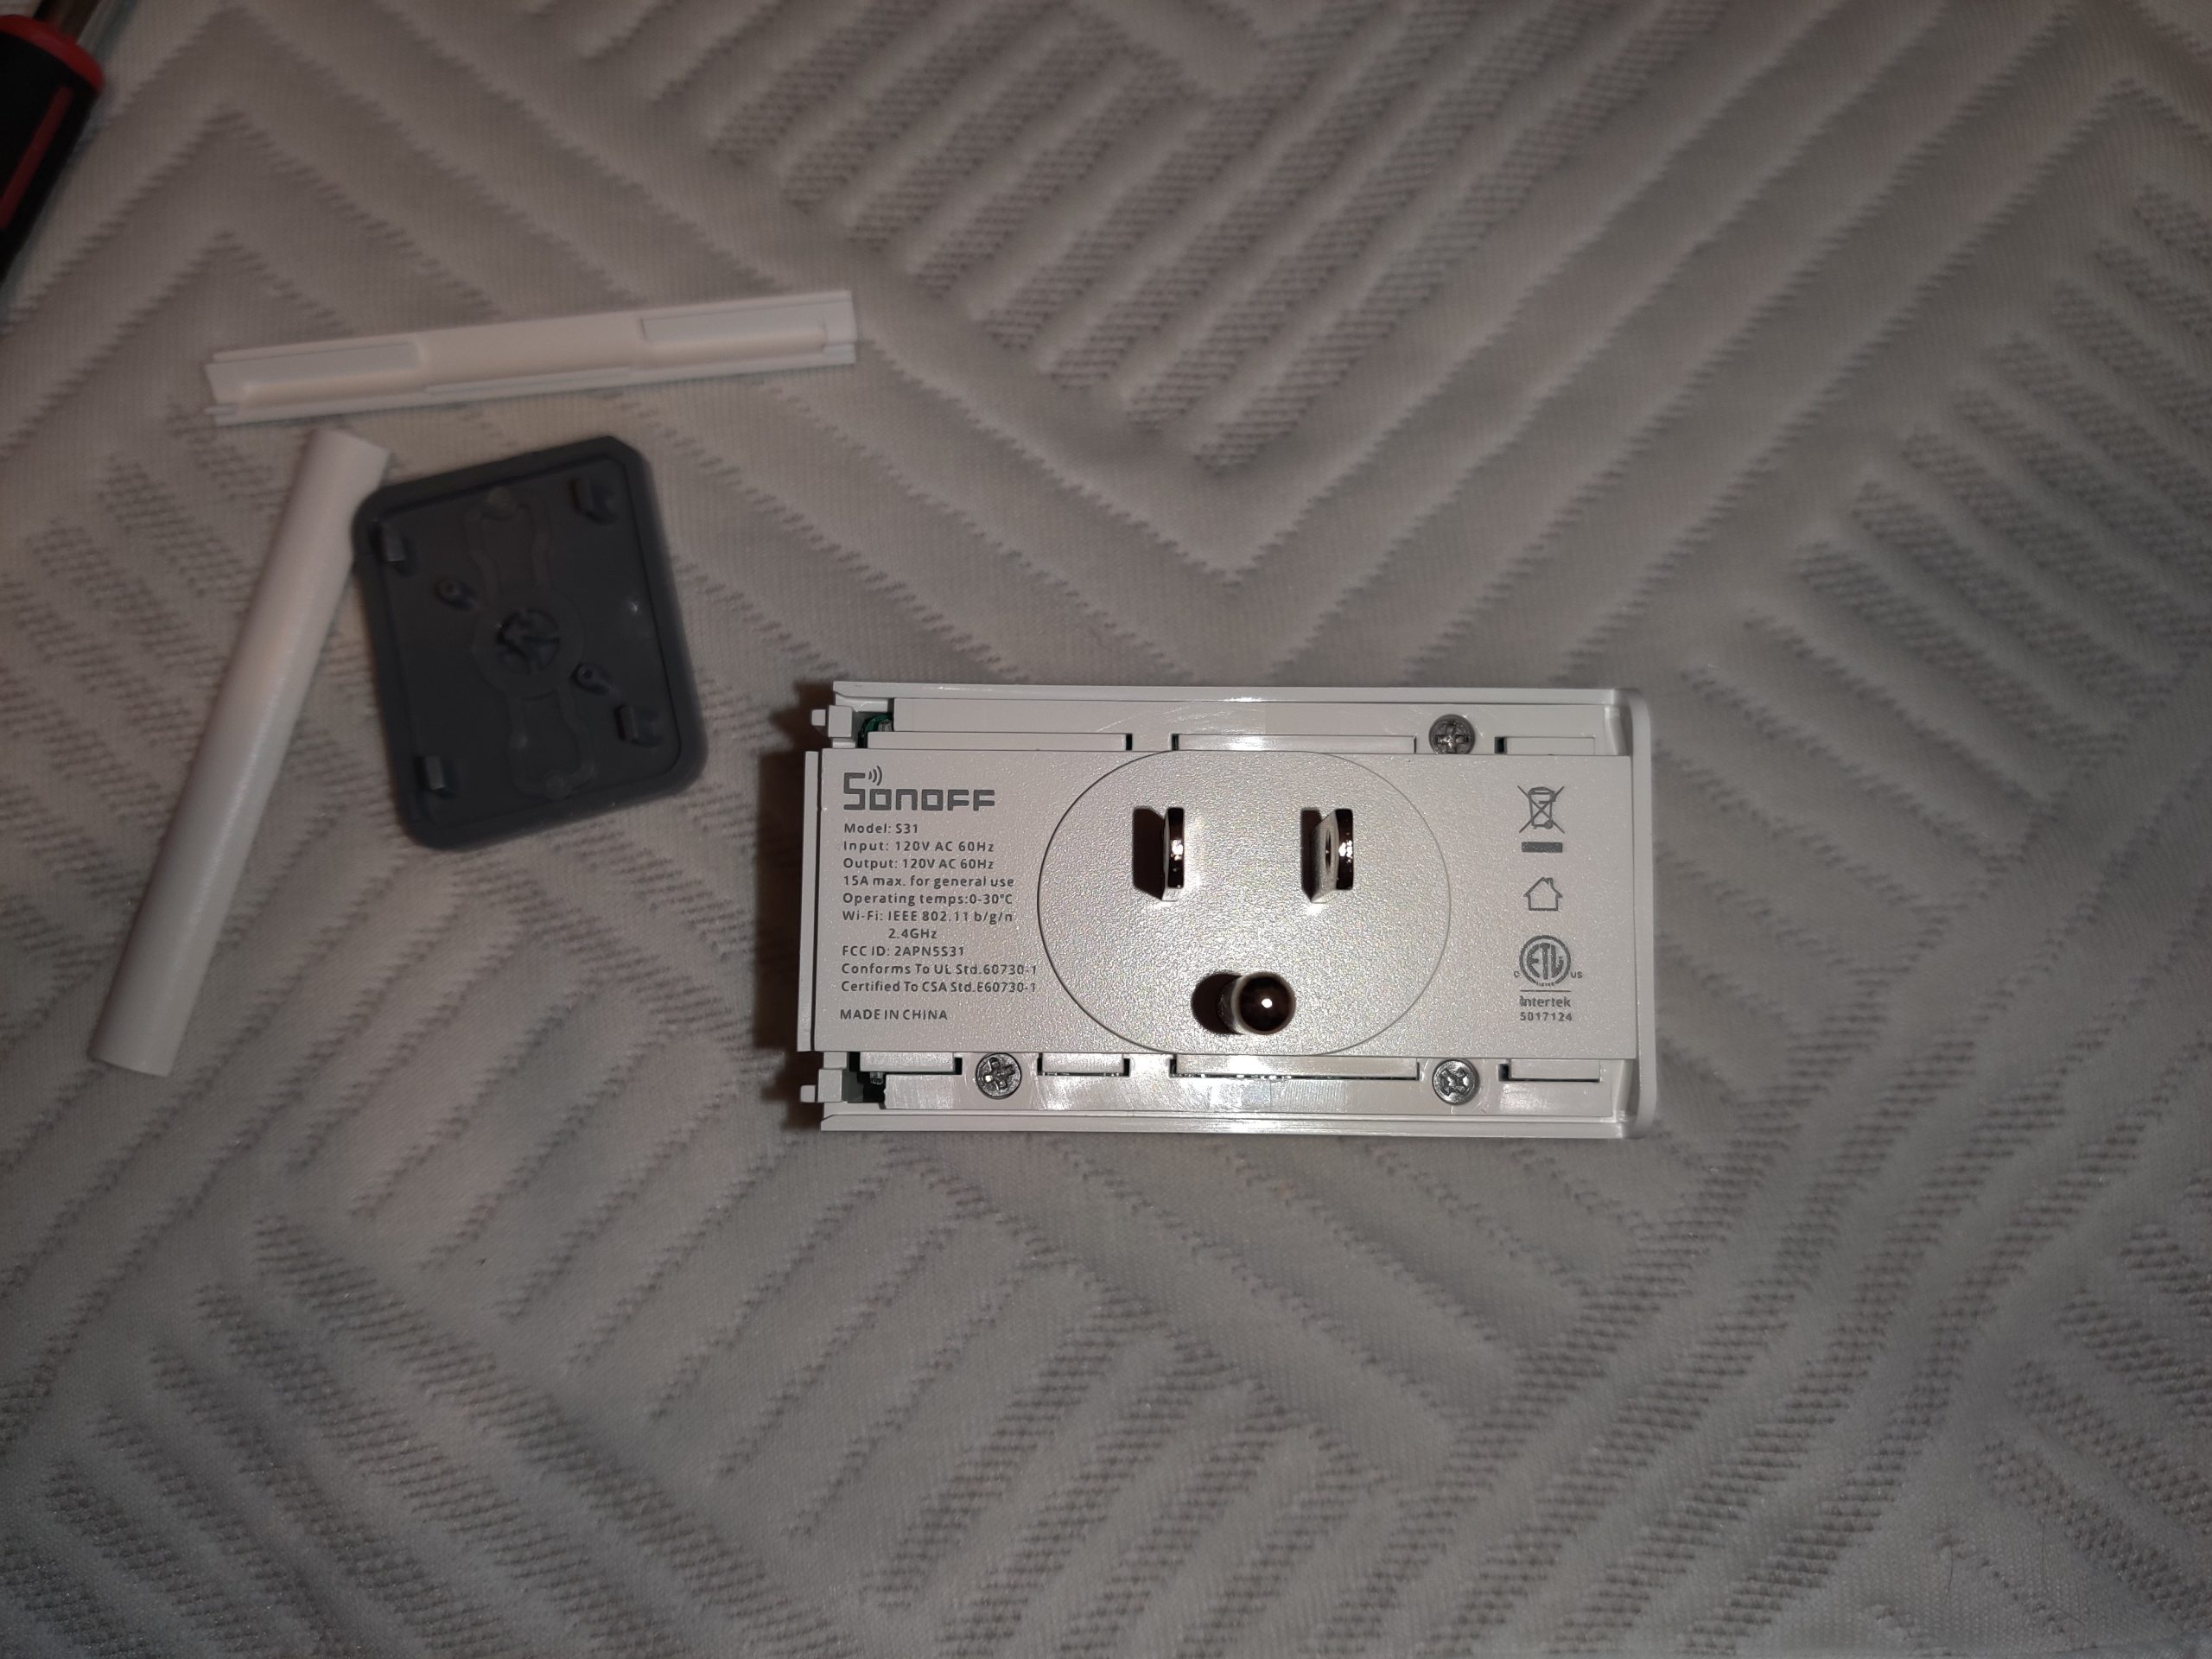
Remove these screws and pull the front of the case off of the rest of the unit. This will expose the output power terminals and a circuit board on the side:
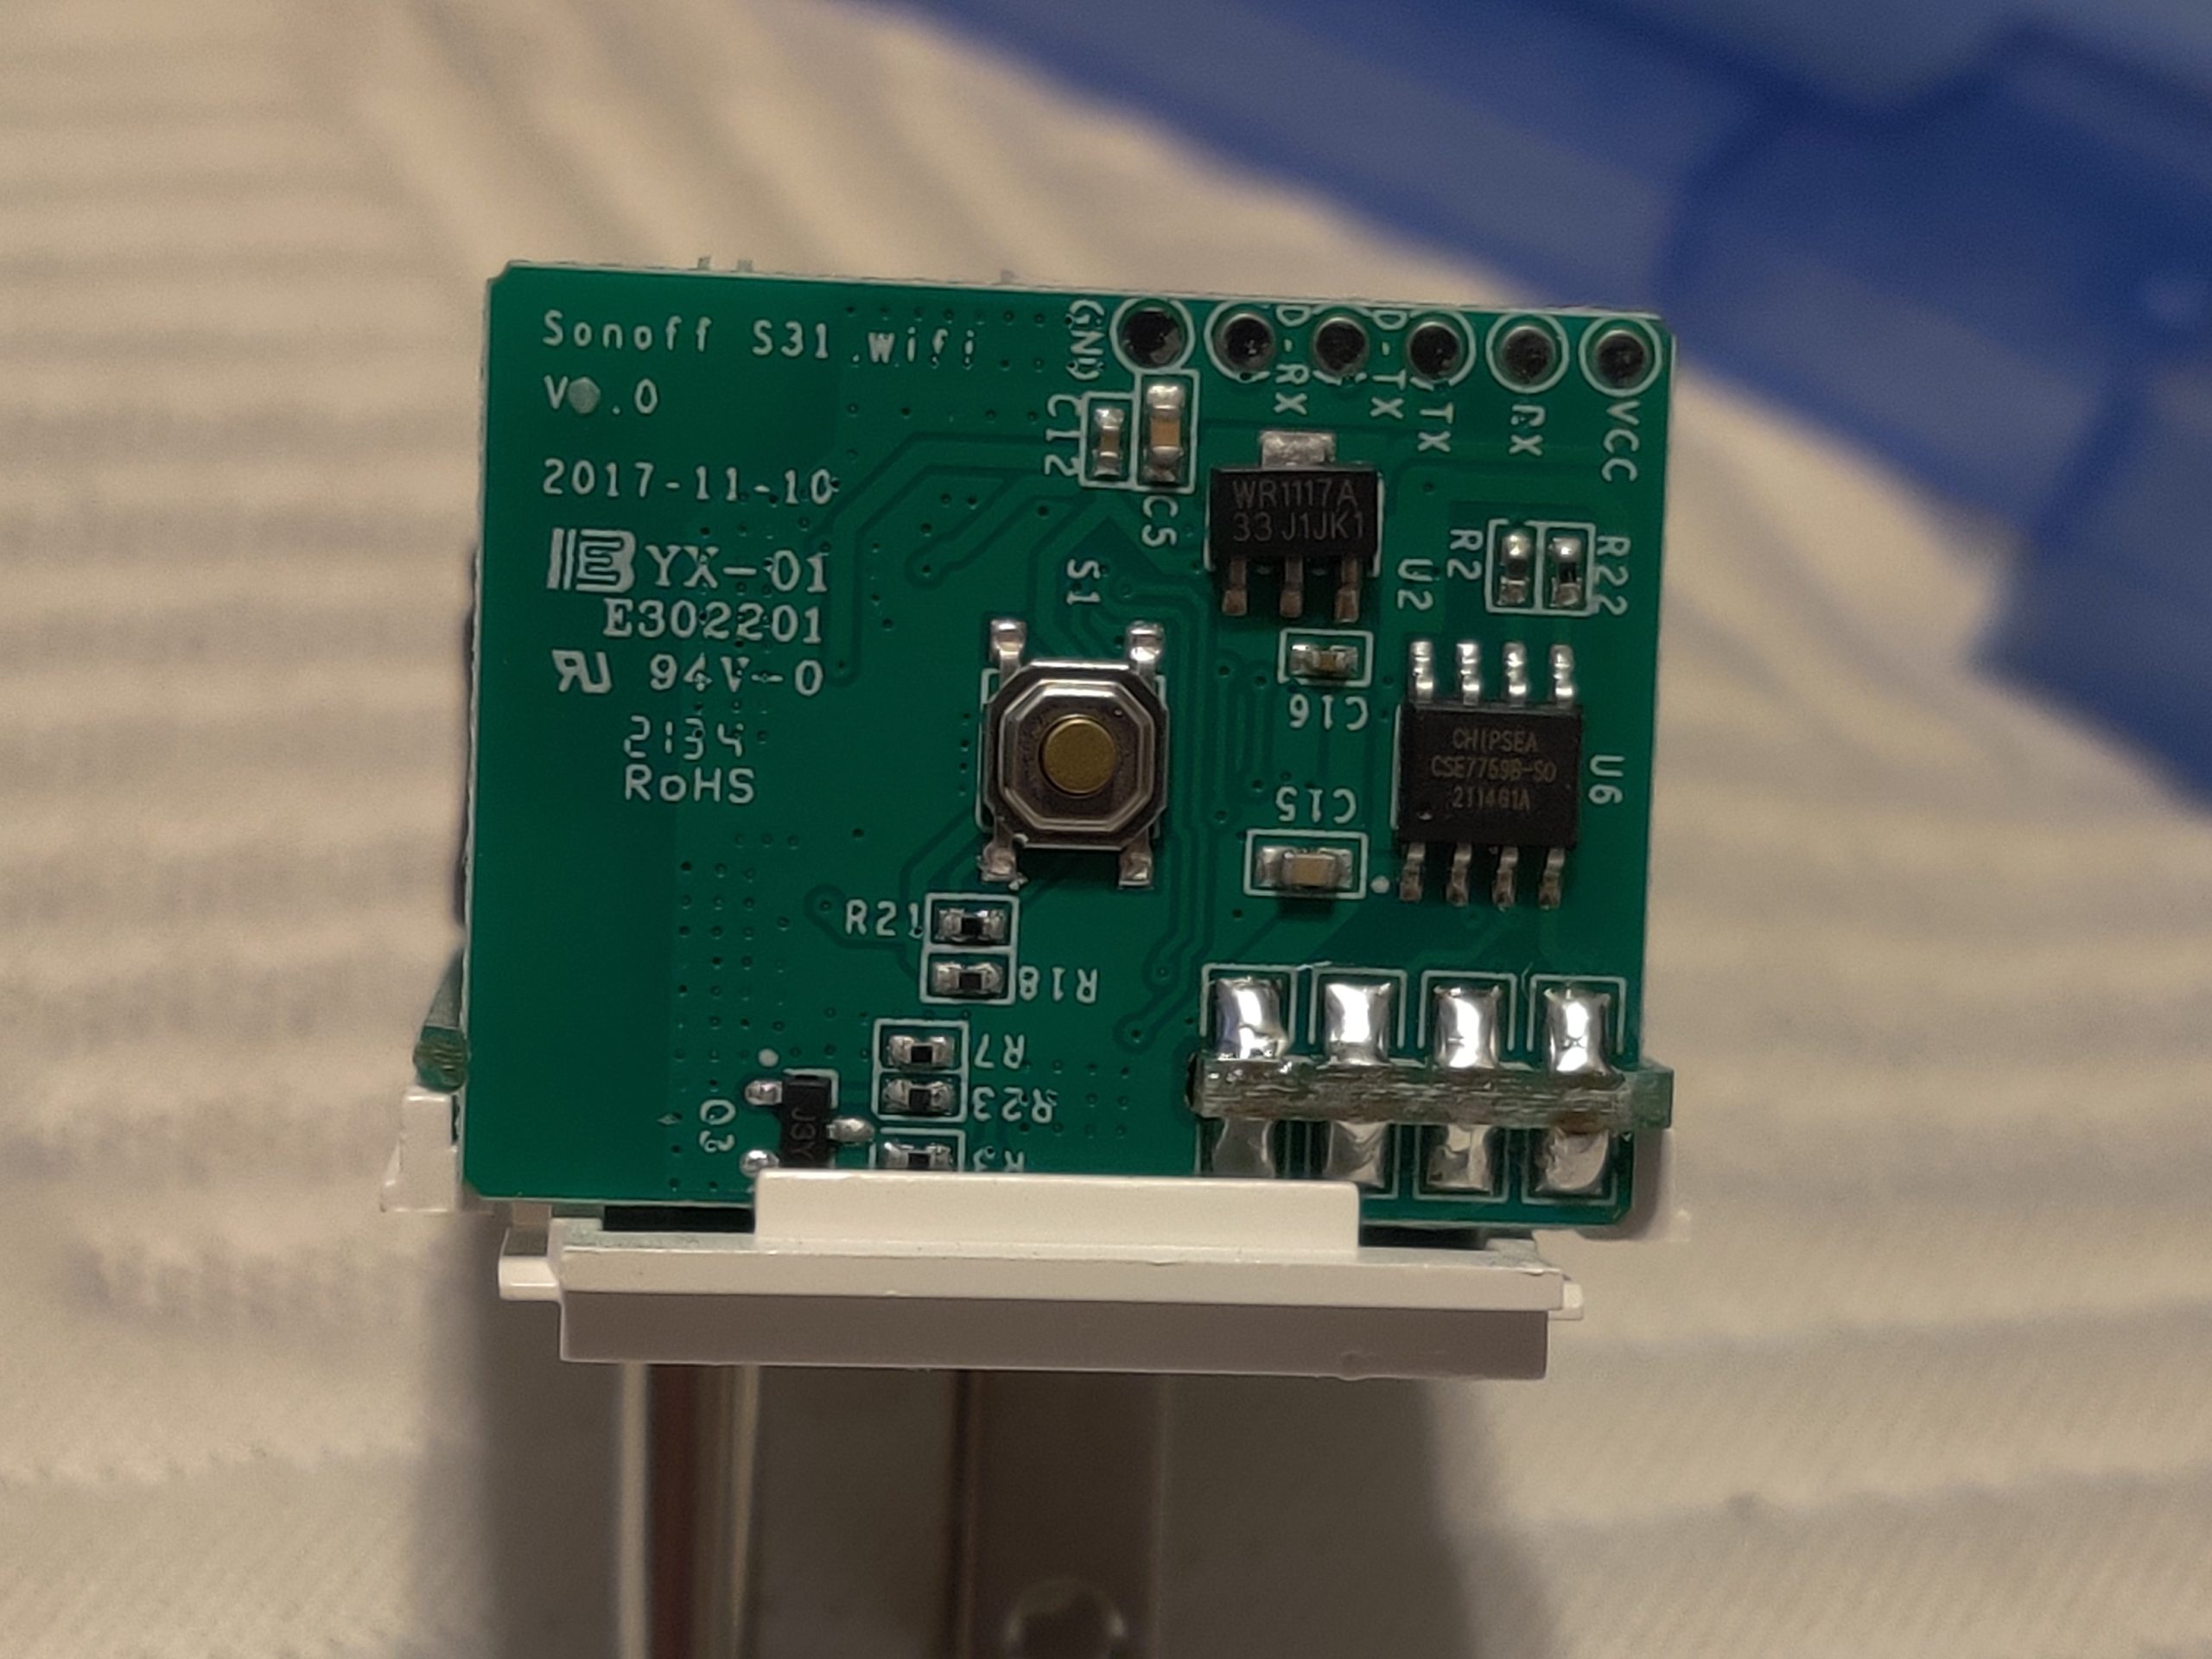
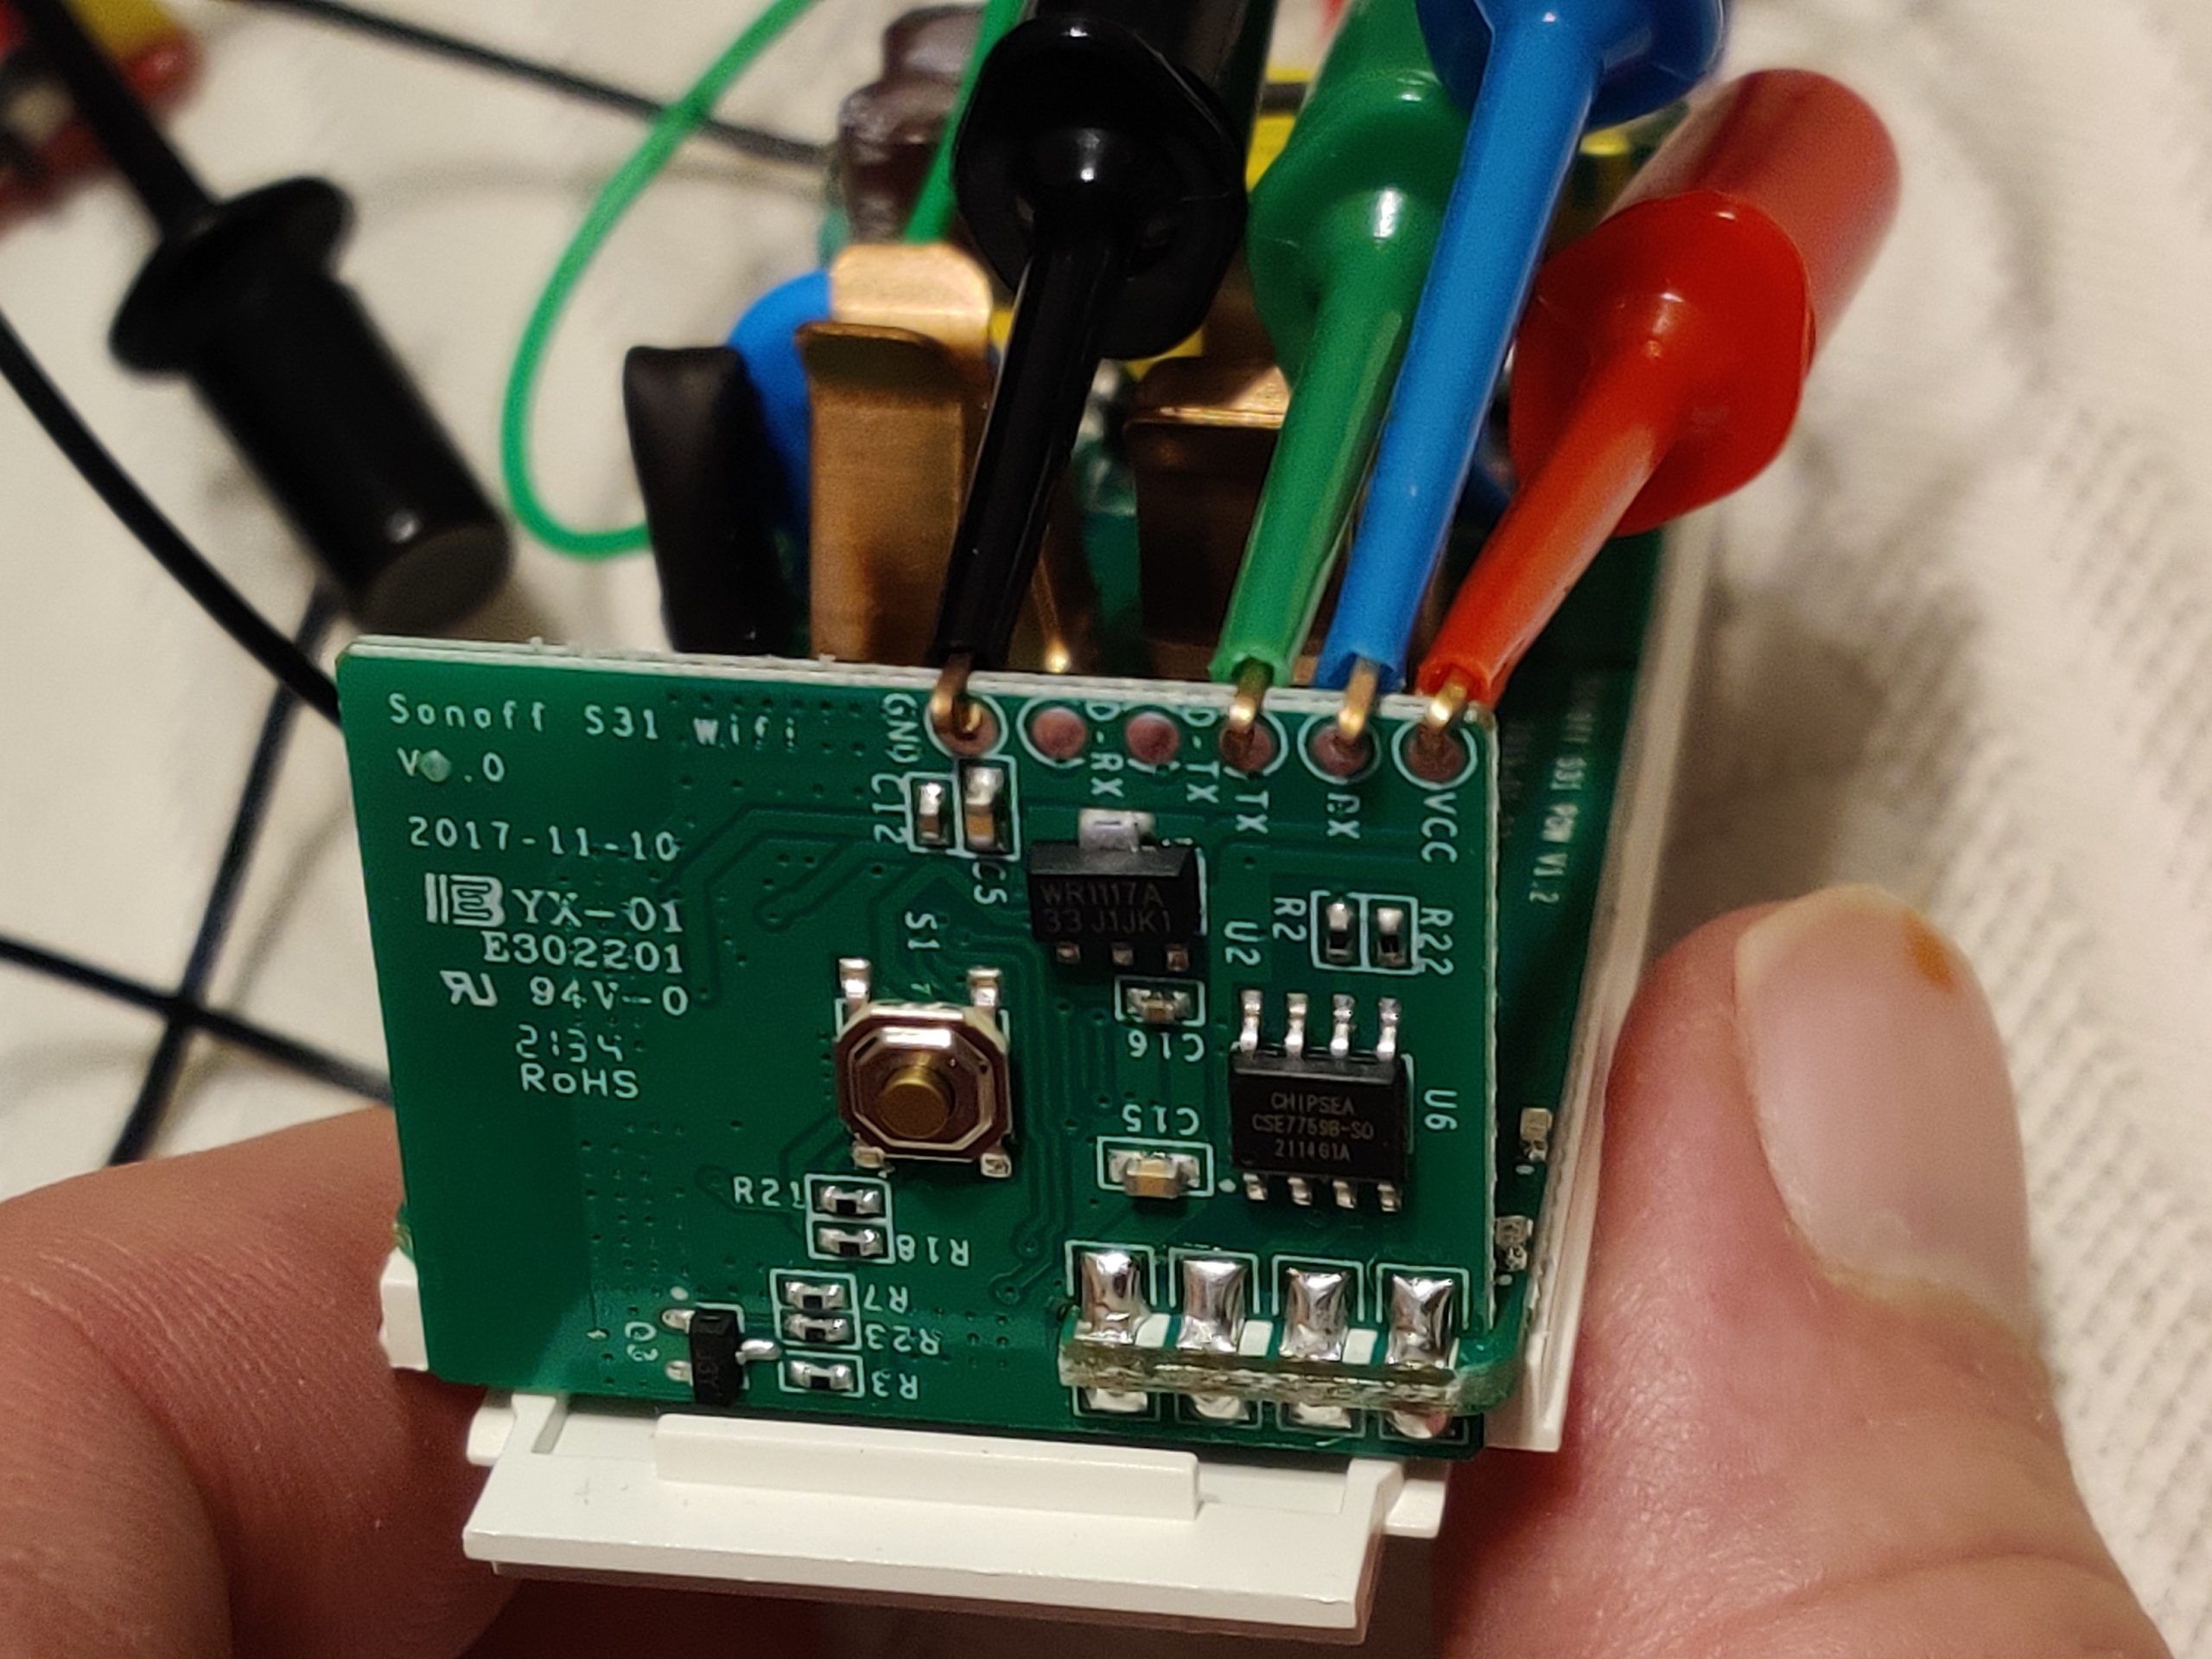
The power button is in the middle. The serial port is on the six pads in the upper right. We’ll use four of the pads: VCC and GND are connected to 3.3V power and RX and TX carry data. (Don’t use the pins labeled D-RX and D-TX.)
Plug the header pins into the USB-to-serial adapter and connect four of your test hook leads as shown below:
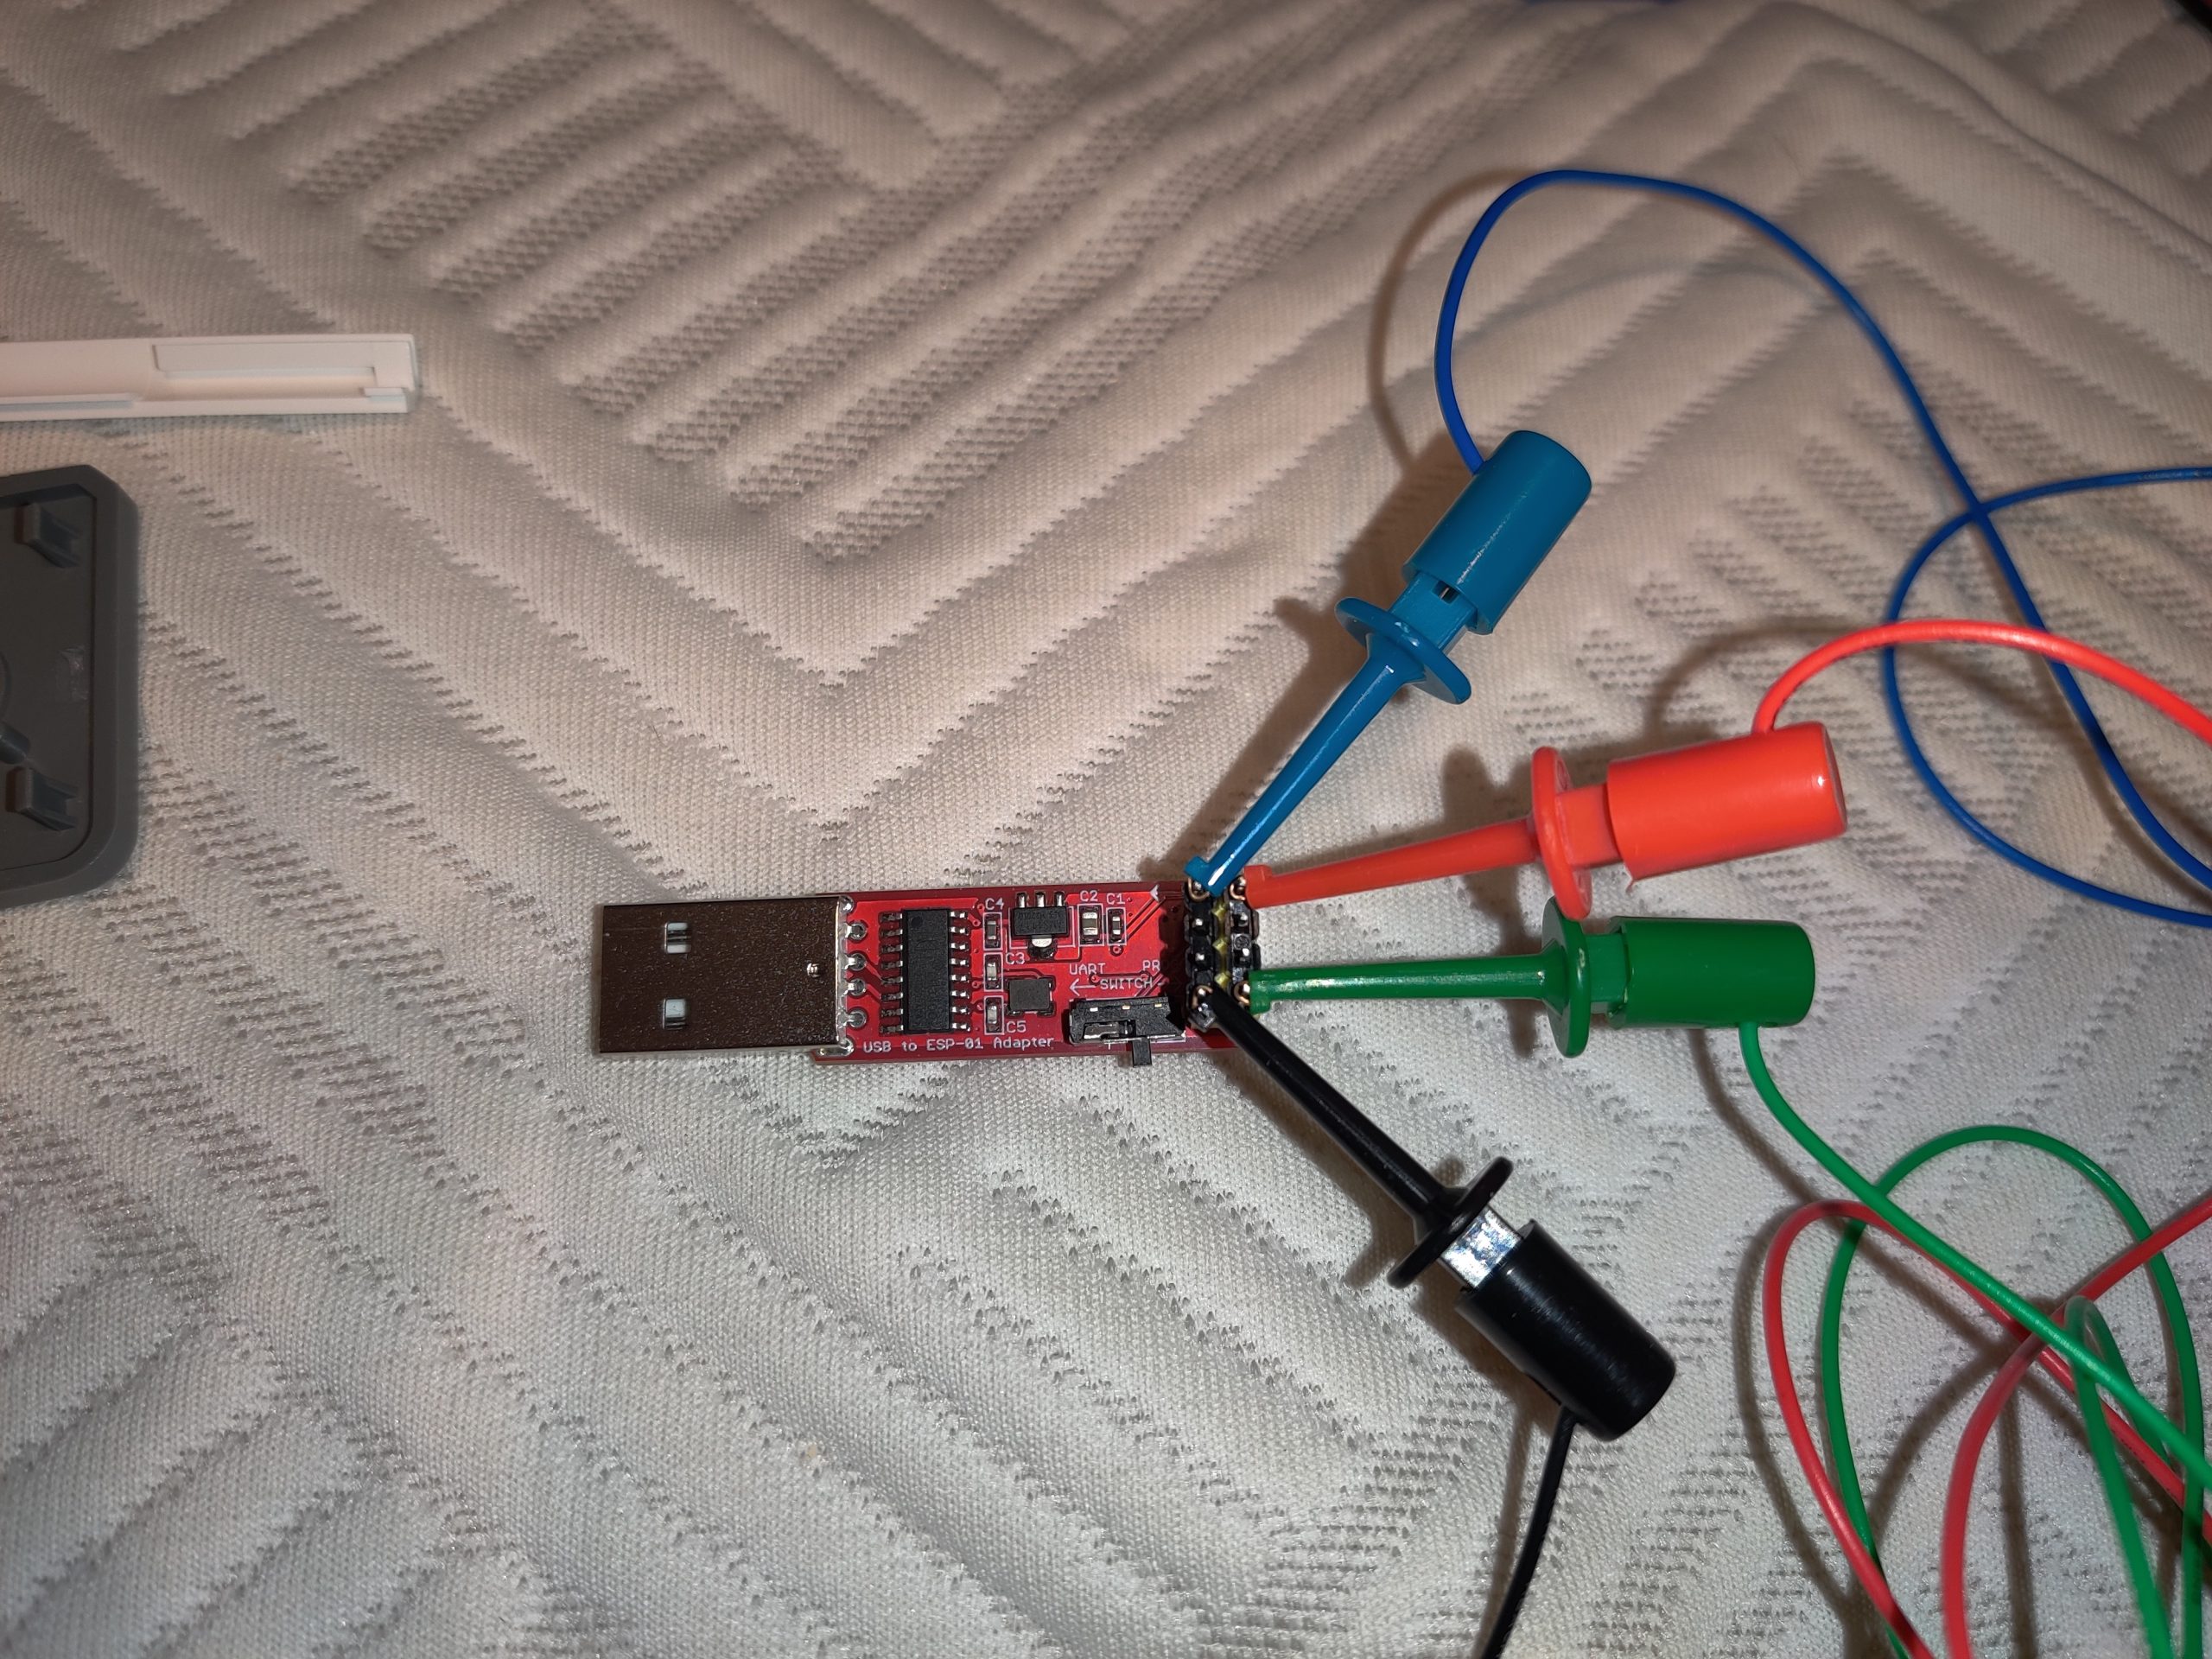
With the colors I’m using, red is 3.3V, black is GND, blue is TX (which will be connected to RX on the S31), and green is RX (which will be connected to TX on the S31).
Next, connect the other ends of the leads to the S31:
Hold down the button when you plug the adapter into an available USB port; this kicks the S31 into bootloader mode, preparing it to receive firmware.
If this is your first time using ESPHome, create a directory to store device configurations. You might want to check it into Git or other version control as you add/edit devices, but that’s beyond the scope of this document.
mkdir ~/esphome-configsFire up ESPHome. First, launch the server (if your USB serial adapter isn’t on /dev/ttyUSB0, substitute its actual location below):
docker run -it --rm --device /dev/ttyUSB0 -v ~/esphome-configs:/config -v /usr/share/fonts:/usr/share/fonts --network host esphome/esphomeThen, pop open a web browser and go to http://localhost:6052. Hit the “New Device” button down in the lower right. In the dialog that pops up, give your new device a name…could be related to its location, what it will control, or whatever. In the “Select your ESP device” dialog, select “Pick specific board” and choose “Generic ESP8266 (for example Sonoff)”. Instead of clicking Install, press Esc because we need to customize the configuration. On the new device entry, click Edit and replace the contents with the following. Customize the device name and WiFi credentials appropriately:
# Basic Config
esphome:
  name: [device name goes here]
  platform: ESP8266
  board: esp01_1m

wifi:
  ssid: "[your WiFi SSID goes here]"
  password: "[your WiFi password goes here]"

logger:
  baud_rate: 0 # (UART logging interferes with cse7766)

api:

ota:

web_server:
  port: 80

# Device Specific Config

uart:
  rx_pin: RX
  baud_rate: 4800

binary_sensor:
  - platform: gpio
    pin:
      number: GPIO0
      mode: INPUT_PULLUP
      inverted: True
    name: "button"
    on_press:
      - switch.toggle: relay
  - platform: status
    name: "status"

sensor:
  - platform: wifi_signal
    name: "wifi_signal"
    update_interval: 60s
  - platform: cse7766
    current:
      name: "current"
      accuracy_decimals: 1
    voltage:
      name: "voltage"
      accuracy_decimals: 1
    power:
      name: "power"
      accuracy_decimals: 1
      id: power
  - platform: integration
    name: "energy"
    sensor: power
    time_unit: h
    unit_of_measurement: kWh
    filters:
      - multiply: 0.001

time:
  - platform: sntp
    id: the_time

switch:
  - platform: gpio
    name: "relay"
    pin: GPIO12
    id: relay
    restore_mode: ALWAYS_ON

status_led:
  pin: GPIO13
Click Save, then click Install. When asked how to install, click “Plug into the computer running ESPHome Dashboard,” select /dev/ttyUSB0, and then wait for the firmware to upload. When it’s done, unplug the adapter and plug it back in to reset. After a few seconds, the S31 should connect to your WiFi.
Reassembly is the reverse of disassembly. Once it’s put back together, plug the S31 into a wall outlet. After a few seconds, it should pop up on your network. You’re done! In the future, when you need to update or change firmware, you’ll be able to do so wirelessly, without unplugging it from the wall. You should only need to do this once for every S31 you want to use.
…and his goons at OSHA:
In-N-Out says “no” to medical apartheid:
They really do think we’re a bunch of idiots. One might consider that as a massive case of projection:
Democrats, 2001: “Dissent is patriotic.”
Democrats, 2009: “DIssent is racism.”
Democrats, 2017: “Dissent is patriotic again.”
Democrats, 2021: “Dissent is terrorism.”

I migrated my home server from Gentoo Linux to Flatcar Container Linux a little while back, but hadn’t yet migrated the document backups the old server was making. I was using Duplicity to back up documents to the free space within a Linode VPS, but an increase in the size of the backup set was causing the VPS to run out of disk space. With the new server, I decided to try moving the backups from the VPS to Object Storage. (This is an S3-compatible system, so you can probably adapt these instructions to other S3-compatible storage systems…or to Amazon S3 itself. In figuring this out, I started with example configurations for other S3-compatible services and tweaked where necessary.)
I’m using the wernight/duplicity container to back up files. It needs to be provided two persistent volumes, one for your GnuPG keyring and another for cache. The data to be backed up should also be provided to it as a volume. Access credentials for Linode Object Storage should be stored in an environment file.
To make working with containerized Duplicity more like Duplicity on a non-containerized system, you might wrap it in a shell script like this:
#!/usr/bin/env bash
docker run -it --rm --user 1000 --env-file /mnt/ssd/container-state/duplicity/env -v /mnt/ssd/container-state/duplicity/gnupg:/home/duplicity/.gnupg -v /mnt/ssd/container-state/duplicity/cache:/home/duplicity/.cache/duplicity -v /mnt/storage/files:/mnt/storage/files wernight/duplicity $*
(BTW, if you’re not running a container system, you can invoke an installed copy of Duplicity with the same options taken by this script.)
My server hosts only my files, so running Duplicity with my uid is sufficient. On a multi-user system, you might want to use root (uid 0) instead. Your GnuPG keyring gets mapped to /home/duplicity/.gnupg and persistent cache gets mapped to /home/duplicity/.cache/duplicity. /mnt/storage/files is where the files I want to back up are located.
The zeroth thing you should do, if you don’t already have one, is create a GnuPG key. You can do that here with the script above, which I named duplicity on my server:
./duplicity gpg --generate-key
./duplicity gpg --export-secret-keys -a
FIrst thing you need to do (if you didn’t just create your key above) is to store your GnuPG (or PGP) key with Duplicity. Your backups will be encrypted with it:
./duplicity gpg --import /mnt/storage/files/documents/my_key.ascOnce it’s imported, you should probably set the trust on it to “ultimate,” since it’s your key:
./duplicity gpg --update-trustdbOne last thing we need is your key’s ID…or, more specifically, the last 8 digits of it, as this is how you tell Duplicity what key to use. Take a look at the output of this command:
./duplicity gpg --list-secret-keysOne of these (possibly the only one in there) will be the key you created or imported. It has a 32-digit hexadecimal ID. We need just the last 8 digits. For mine, it’s 92C7689C.
Next, pull up the Linode Manager in your browser and select Object Storage from the menu on the left. Click “Create Bucket” and follow the prompts; make note of the name and the URL associated with the bucket, as we’ll need those later. Switch to the access keys tab and click “Create Access Key.” Give it a label, click “Submit,” and make note of both the access key and secret key that are provided.
Your GPG key’s passphrase and Object Storage access key should be stored in an environment file. Mine’s named /mnt/ssd/container-state/duplicity/env and contains the following:
PASSPHRASE=<gpg-key-passphrase>
AWS_ACCESS_KEY_ID=<object-storage-access-key>
AWS_SECRET_ACCESS_KEY=<object-storage-secret-key>
Now we can run a full backup. Running Duplicity on Linode Object Storage (and maybe other S3-compatible storage) requires the –allow-source-mismatch and –s3-use-new-style options:
./duplicity duplicity --allow-source-mismatch --s3-use-new-style --asynchronous-upload --encrypt-key 92C7689C full /mnt/storage/files/documents s3://us-southeast-1.linodeobjects.com/document-backup“full” specifies a full backup; replace with “incr” for an incremental backup. Linode normally provides the URL with the bucket name as a subdomain of the server instead of as part of the path; you need to rewrite it from https://bucket-name.server-addr to s3://server-addr/bucket-name.
After sending a full backup, you probably want to delete the previous full backups:
./duplicity duplicity --allow-source-mismatch --s3-use-new-style --asynchronous-upload --encrypt-key 92C7689C --force remove-all-but-n-full 1 s3://us-southeast-1.linodeobjects.com/document-backupYou can make sure your backups are good:
./duplicity duplicity --allow-source-mismatch --s3-use-new-style --asynchronous-upload --encrypt-key 92C7689C verify s3://us-southeast-1.linodeobjects.com/document-backup /mnt/storage/files/documentsChange “verify” to “restore” and you can get your files back if you’ve lost them. Note that restore won’t overwrite a file that exists, so a full restore should be into an empty directory.
Setting up cronjobs (or an equivalent) to do these operations on a regular basis is left as an exercise for the reader. :)
I didn’t see much out there that describes how to set up a Flatcar Container Linux VM at Linode. What follows is what I came up with; it’ll put up a basic system that’s accessible via SSH.
You’ll need a Linux system to prep the installation, as well as about 12 GB of free space. The QEMU-compatible image that is available for download is in qcow2 format; Linode needs a raw-format image. You can download and convert the most recent image as follows (you’ll need QEMU installed, however your distro provides for that):
wget https://stable.release.flatcar-linux.net/amd64-usr/current/flatcar_production_qemu_image.img.bz2 && bunzip2 flatcar_production_qemu_image.img.bz2 && qemu-img convert -f qcow2 -O raw flatcar_production_qemu_image.img tmp.img && mv tmp.img flatcar_production_qemu_image.img && bzip2 -9 flatcar_production_qemu_image.imgYou also need a couple of installation tools for Flatcar Container Linux: the installation script and the configuration transpiler. The most recent script is available on GitHub:
wget https://raw.githubusercontent.com/flatcar-linux/init/flatcar-master/bin/flatcar-install -O flatcar-install.sh && chmod +x flatcar-install.shSo’s the transpiler…you can grab the binary from the releases page. You’ll want to grab the latest ct-v*-x86_64-unknown-linux-gnu and rename it to ct.
Next, we need a configuration script. Here’s a basic YAML file that enables SSH login. You’ll want to substitute your own username and SSH public key for mine. Setting the hostname and timezone to appropriate values for you might also be a good idea. Save this as config.yaml:
passwd:
  users:
    - name: salfter
      groups:
        - sudo
        - wheel
        - docker # or else Docker won't work
      ssh_authorized_keys:
        - ssh-ed25519 AAAAC3NzaC1lZDI1NTE5AAAAIBJQgbySEtaT8SqZ37tT7S4Z/gZeGH+V5vGZ9i9ELpmU salfter@janeway

etcd:
  # go to https://discovery.etcd.io/new to get a new ID
  discovery: https://discovery.etcd.io/c4e7dd71d5a3eae58b6b5eb45fcba490

storage:
  disks:
    - device: /dev/sda
    - device: /dev/sdb
  filesystems:
    - name: "storage"
      mount:
        device: "/dev/sdb"
        format: "ext4"
        label: "storage"
        # wipe_filesystem: true
  directories:
    - filesystem: "storage"
      path: "/docker"
      mode: 0755
    - filesystem: "storage"
      path: "/containerd"
      mode: 0755
    - filesystem: "storage"
      path: "/container-state"
      mode: 0755

  files:
    # set hostname
    - path: /etc/hostname
      filesystem: root
      mode: 0644
      contents:
        inline: |
          flatcar
    # /etc/resolv.conf needs to be a file, not a symlink
    - path: /etc/resolv.conf
      filesystem: root
      mode: 0644
      contents:
        inline: |

  links:
    # set timezone
    - path: /etc/localtime
      filesystem: root
      overwrite: true
      target: /usr/share/zoneinfo/US/Pacific

systemd:
  units:
    # mount the spinning rust
    - name: mnt-storage.mount
      enabled: true
      contents: |
        [Unit]
        Before=local-fs.target
        [Mount]
        What=/dev/disk/by-label/storage
        Where=/mnt/storage
        Type=ext4
        [Install]
        WantedBy=local-fs.target
    # store containers on spinning rust
    - name: var-lib-docker.mount
      enabled: true
      contents: |
        [Unit]
        Before=local-fs.target
        [Mount]
        What=/mnt/storage/docker
        Where=/var/lib/docker
        Type=none
        Options=bind
        [Install]
        WantedBy=local-fs.target
    - name: var-lib-containerd.mount
      enabled: true
      contents: |
        [Unit]
        Before=local-fs.target
        [Mount]
        What=/mnt/storage/containerd
        Where=/var/lib/containerd
        Type=none
        Options=bind
        [Install]
        WantedBy=local-fs.target
    # Ensure docker starts automatically instead of being socket-activated
    - name: docker.socket
      enabled: false
    - name: docker.service
      enabled: true

docker:
Use ct to compile config.yaml to config.json, which is what the Flatcar installer will use:
./ct --in-file config.yaml >config.jsonNow it’s time to set up a new Linode. Get whatever size you want. Set it up with any available distro; we’re not going to use it. (I initially intended to leave a small Alpine Linux configuration up to bootstrap and update the system, but you really don’t need it. Uploading and installation can be done with the Finnix rescue system Linode provides.) Shut down the new host, delete both the root and swap filesystems disks that Linode creates, and create two new ones: a 10-GB Flatcar boot disk and a data disk that uses the rest of your available space. Configure the boot disk as /dev/sda and the data disk as /dev/sdb.
Reboot the node in rescue mode. This will (as of this writing, at least) bring it up in Finnix from a CD image. Launch the Lish console and enable SSH login:
passwd root && systemctl start sshd && ifconfigMount the storage partition so we can upload to it:
mkdir /mnt/storage && mount /dev/sdb /mnt/storage && mkdir /mnt/storage/installMake note of the node’s IP address; you’ll need it. I’ll use 12.34.56.78 as an example below.
Back on your computer, upload the needed files to the node…it’ll take a few minutes:
scp config.json flatcar-install.sh flatcar_production_qemu_image.img.bz2 root@12.34.56.78:/mnt/storage/install/Back at the node, begin the installation…it’ll take a few more minutes:
./flatcar-install.sh -f flatcar_production_qemu_image.img.bz2 -d /dev/sda -i config.jsonOnce the installation is complete, shut down the node. In the Linode Manager page for your node, go to the Configurations tab and edit the configuration. For “Select a Kernel” under “Boot Settings,” change from the default “GRUB 2” to “Direct Disk.” /dev/sda is a hard-drive image, not a filesystem image; this will tell Linode to run the MBR on /dev/sda, which will start the provided GRUB and load the kernel.
Now, you can bring up your new Flatcar node. If you still have the console window up, you should see that it doesn’t take long at all to boot…maybe 15 seconds or so once it gets going. Once it’s up, you can SSH in with the key you configured.
From here, you can reconfigure more or less like any other Flatcar installation. If you need to redo the configuration, probably the easiest way to do that is to upload your config.json to /usr/share/oem/config.ign, touch /boot/flatcar/first_boot, and reboot. This will reread the configuration, which is useful for adding new containers, creating a persistent SSH configuration, etc.