Category Archives: computers

Running a Collabora server behind caddy-docker-proxy

Just a quick cheatsheet-ish post as I figure out how to move my home server off nginx and onto caddy-docker-proxy, which I hope will make configuration easier in the long run. Figuring out what labels to attach to get Caddy to do what I want is a minor stumbling block.

In this case, it’s working with the Collabora server that my Nextcloud instance uses to enable online editing of office-type files. The sticking point is that the server complains if Nextcloud connects over plain HTTP, but Caddy (though which Nextcloud will connect) complained about the Collabora server’s self-signed SSL certificate.

This docker-compose.yml is what I ended up using:

services:
  collabora:
    image: collabora/code
    container_name: collabora
    restart: unless-stopped
    environment:
      extra_params: --o:ssl.enable=true
    networks:
      - www
    labels:
      caddy: collabora.alfter.us
      caddy.reverse_proxy: https://collabora.www:9980
      caddy.reverse_proxy.transport: http 
      caddy.reverse_proxy.transport.tls_insecure_skip_verify:
      
networks:
  www:
    name: www
    external: true

The “www” network connects Nginx and Caddy (eventually just Caddy) to all of the containers to be proxied. The first two labels are pretty normal, but the last two are what tell Caddy to ignore Collabora’s self-signed certificate. The part of the Caddyfile that handles collabora.alfter.us ends up looking something like this:

collabora.alfter.us {
  reverse_proxy https://collabora.www {
    transport http {
      tls_insecure_skip_verify
    }
  }
}

Cheatsheet: install debloated Windows 11 on QEMU

This pulls together tips from https://christitus.com/windows-11-perfect-install/, https://christitus.com/install-windows-the-arch-linux-way/, https://blogs.oracle.com/virtualization/post/install-microsoft-windows-11-on-virtualbox, and some other sources I’ve forgotten. It’s mainly aimed at getting Win11 running under QEMU on Gentoo Linux, but should also work for bare-metal installs, QEMU on other platforms, or other virtualization platforms (VMware, VirtualBox, etc.).

  1. Verify kernel prerequisites as described in https://wiki.gentoo.org/wiki/QEMU
  2. Install app-emulation/qemu and app-emulation/libvirt
  3. Start /etc/init.d/libvirtd, and add it to the default runlevel:
    sudo rc-update add libvirtd
  4. Add yourself to the kvm group:
    sudo usermod -aG kvm `whoami`
  5. Download the latest Win11 ISO from https://www.microsoft.com/software-download/windows11
  6. Download the latest libvirt driver ISO from https://github.com/virtio-win/virtio-win-pkg-scripts/
  7. Start virt-manager and create a new VM, installing from the Win11 ISO. Most defaults are OK, with the following exceptions:
    a. Change virtual disk storage bus from SATA to virtio
    b. Add new storage, select the driver ISO, and change type from disk to CD-ROM
    c. Change network device type from e100e to virtio
  8. Start the VM; Win11 setup should begin.
  9. Disable TPM and Secure Boot checks in the installer:
    a. When the installer begins, press Shift-F10 and launch regedit from the command prompt.
    b. Add a new key named LabConfig under HKLM\SYSTEM\Setup
    c. Add two new DWORDS to HKLM\SYSTEM\Setup\LabConfig named BypassTPMCheck and BypassSecureBootCheck, and set both to 1.
    d. Exit Regedit, close the command prompt, and continue.
  10. Optional: when prompted during installation, select “English (World)” as the time and currency format. This causes a bunch of bloatware and other crap to not be installed.
  11. After installation on the first boot, press Shift-F10 again and enter this to cut OOBE short:
    oobe\BypassNRO
    This will trigger a reboot, followed by a less intrusive offline OOBE process (necessary because the virtual NIC isn’t working yet, and it’s a good idea anyway).
  12. Once the system’s up and running, run virtio-win-guest-tools.exe from the driver ISO to install the remaining needed drivers and other tools.
  13. If you selected “English (World)” as the time and currency format when installing, start intl.cpl and make sure all settings are as they should be (whether “English (United States)” or whatever’s appropriate for you). Do the same for “region settings” in the Settings app.
  14. Open Microsoft Store, search for “App Installer,” and update it…need to do this for Winget to work. (TODO: is there a way to do this with a normal download instead?)
  15. Open a PowerShell admin window and launch Chris Titus’s tweak utility:
    irm christitus.com/win | iex
    Use it to debloat your system, install the software you want, etc.
    Warning: Removing the Edge browser with this utility may break other apps (I know for certain that Teams won’t work), and it might not be possible to get it working right again without a full reinstall. It appears that Edge is embeddable within applications in much the same way that Internet Explorer was once embeddable. Plus ça change
  16. Check for Windows updates in the usual manner.

More Win11-without-TPM/Secure Boot tricks

https://nerdschalk.com/install-windows-11-without-tpm/ has several methods that might be useful, especially for upgrading from Win10 or earlier (as opposed to the clean install described above).

For upgrading to Win11 22H2 from an earlier version, https://jensd.be/1860/windows/upgrade-to-windows-11-22h2-on-unsupported-hardware should be useful.

An ffmpeg cheatsheet

I recently had some need to clean up the subtitles in some video files in my possession. It took a little while to track down the exact set of options to get it to do what I wanted it to do, so I’ve written them down here for future reference. This post may be amended from time to time to add more

Extract subpictures from file

The second number in the -map parameter selects the (zero-indexed) stream to extract. Use something like mediainfo to determine which stream to select, then issue something like one of these:

ffmpeg -i src.m4v -c copy -map 0:2 dest.en.sup  # Blu-ray subpictures
ffmpeg -i src.m4v -c copy -map 0:2 dest.en.vob  # DVD subpictures

Subtitle Edit can read subpictures and convert them to text subtitles. As long as you have a .NET runtime available, it should work; I’ve run it on Windows 11 and Gentoo Linux. Its accuracy is pretty good, especially if you have it use one of the Tesseract OCR engines.

Extract text subtitles from file

ffmpeg -i src.m4v -f srt dest.en.srt

“srt” can be replaced with several other formats (ssa, ass, etc.) if you want those. Depending on the source, there may be extra HTML formatting that you might want to use sed to filter out. If more than one subtitle stream is present, a “-map” parameter may be necessary to select the one you want.

Mux text subtitles into file

ffmpeg -i src.m4v -i src.en.srt -c copy -c:s mov_text -map 0:0 -map 0:1 -map 1:0 -metadata:s:2 language=eng -metadata title= dest.m4v

Assumptions: the desired video and audio are in the first two streams of the first file, and the subtitles are in English. (Audio language should already be set in that stream to whatever it is.)

“-metadata title=” will clear out the title string that might have been set in the original file.

Selecting tracks by language

Instead of needing to look up track numbers, it’d be nice to just specify the language(s) we want to include. That is possible, with something like this:

ffmpeg -i src.mkv -c copy -map 0:v:0 -map 0:a:m:language:ger -map 0:s:m:language:eng dest.mkv

This example selects German audio and English subtitles…useful for something like Das Boot or Deutschland 83. (Assuming that you like foreign shows in their original language with English subtitles, anyway…which I do.) These track mapping options should also apply in the preceding examples.

Extracting chapters from existing file

ffmpeg -i src.mkv -f ffmetadata src.metadata

This creates a file with chapter information (and possibly other metadata) structured like this:

;FFMETADATA1
encoder=Lavf60.3.100
[CHAPTER]
TIMEBASE=1/1000
START=0
END=728102
title=Chapter 1
[CHAPTER]
TIMEBASE=1/1000
START=728102
END=1319902
title=Chapter 2
[CHAPTER]
TIMEBASE=1/1000
START=1319902
END=2008965
...

Inserting chapters

A metadata file structured as above can be inserted into a file when it’s encoded:

ffmpeg -i src.mkv -i src.metadata -map_chapters 1 ...

Audio: transcode anything to AAC

This preserves metadata (including cover art)…tested with FLAC sources, but should work with others:

ffmpeg -i src.flac -c:a libfdk_aac -b:a 128k -c:v copy -disposition:v:1 attached_pic dest.m4a
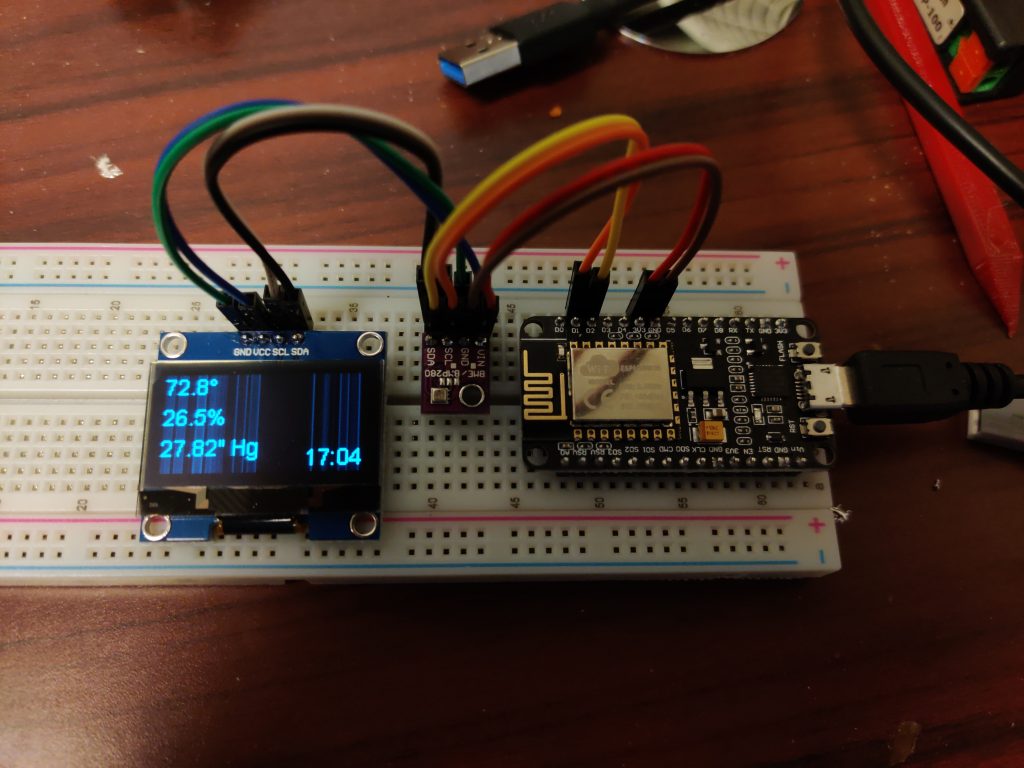
Not bad at all for under $15

The vertical lines in the screen, while present, aren’t as obvious as they are in the photo. The time is off because it’s not on my home network right now and can’t retrieve the correct time.

I’ve been playing around a bit with ESPHome and Home Assistant lately…started with a couple of Sonoff smart outlets, one to replace a Kill-A-Watt monitoring my mining rig and another to switch a light on at sunset.

What’s up above is part of this weather station kit. The metal can on the small board in the center is a BME280 environmental sensor that picks up temperature, humidity, and barometric pressure and makes that information available over I2C. The NodeMCU on the right reads the sensor, publishes its readings over WiFi to a Home Assistant server, and displays the readings (and current time) on the I2C-connected OLED on the left. You could probably use an ESP-01S with a 4-MB flash upgrade since I2C only needs two pins to work, but the kit came with a NodeMCU, so that’s how I brought it up initially.

Wiring is simple: connect ground together on all three boards, connect the power inputs on the OLED and sensor to a 3.3V pin on the NodeMCU, connect the data pins (SDA) to pin D2, and connect the clock pins (SCK) to pin D1.

The ESPHome config file (not really a program as such) looks something like this:

esphome:
  name: bme280
  platform: ESP8266
  board: nodemcuv2

wifi:
  ssid: "your_wifi_ssid"
  password: "your_wifi_password"

# Enable logging
logger:

# Enable Home Assistant API
api:

ota:

i2c:

sensor:
  - platform: bme280
    address: 0x76
    temperature:
      name: "BME280 Temperature"
      id: temp
      oversampling: 16x
    pressure:
      name: "BME280 Pressure"
      id: baro
    humidity:
      name: "BME280 Humidity"
      id: humid
    update_interval: 60s

display:
  - platform: ssd1306_i2c
    model: "SH1106 128x64"
    lambda: |-
      it.strftime(127, 60, id(arial14), TextAlign::BASELINE_RIGHT, "%H:%M", id(esptime).now());      
      it.printf(0, 0, id(arial14), TextAlign::TOP_LEFT, "%.1f°", id(temp).state*1.8+32.0);
      it.printf(0, 20, id(arial14), TextAlign::TOP_LEFT, "%.1f%%", id(humid).state);
      it.printf(0, 40, id(arial14), TextAlign::TOP_LEFT, "%.2f\" Hg", id(baro).state*0.0295);
      
time:
  - platform: homeassistant
    id: esptime
    
font:
  - file: "/usr/share/fonts/corefonts/arial.ttf"
    id: arial14
    size: 14
    

The sensor returns temperature in °C and barometric pressure in hPa; the code above converts those to more sensible units for display. Also, you’ll probably need to update the font file location to whatever is correct for your system. (I have ESPHome installed on Gentoo Linux and have the corefonts package installed.)

Something like this would be useful to have indoors. For an outdoors weather sensor, leave off the screen and the related sections (display, time, and font) from the config file. Next task is to fab up an enclosure of some sort.

Who knew? The Google Play Books Chrome app has an offline mode.

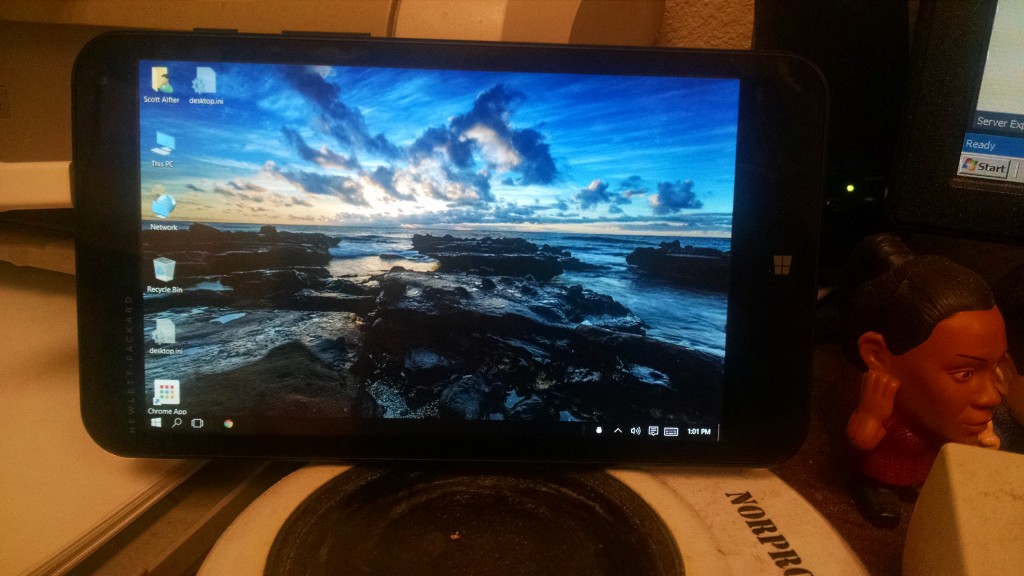
IMG_20151104_130132A new tablet arrived yesterday: an HP Stream 7, which set me back a whopping $60 at Woot.  After letting it update itself from Windows 8.1 to Windows 10 (yes, it runs Windows, not Android or iOS) and putting Chrome and a few other apps on it, I set out to find a decent ebook reader.  Ideally, it’d support ePub and would sync bookmarks between existing devices.

I have been using Google Play Books to share my collection between Android and iOS devices.  Apps are available for both to download part or all of your collection for offline reading; bookmarks are synced when online.  Unfortunately, there’s no dedicated Windows app…but it turns out that’s not a problem.

After trying several ebook apps for Windows and finding them wanting in one measure or another, I ran across references to a couple of things I didn’t know about:

  • Google Play Books is available as a Chrome app
  • The Chrome app can use HTML5 local storage to hold selected ebooks for offline reading

Sweet!  The only tricky part now was selecting books for offline reading.  You’re supposed to hover the mouse pointer over the title you want to download, then click a “make available offline” checkbox that pops up.  Without a mouse, though, you can’t hover over anything.

That’s where a program called TouchMousePointer comes into play.  It converts part of the screen area into a touchpad, and puts up a mouse pointer that you can hover over the books you want to download.  It’s easily toggled off most of the time, but is there if you need more precise positioning than your fingers can deliver (as apps written with a mouse in mind might need).

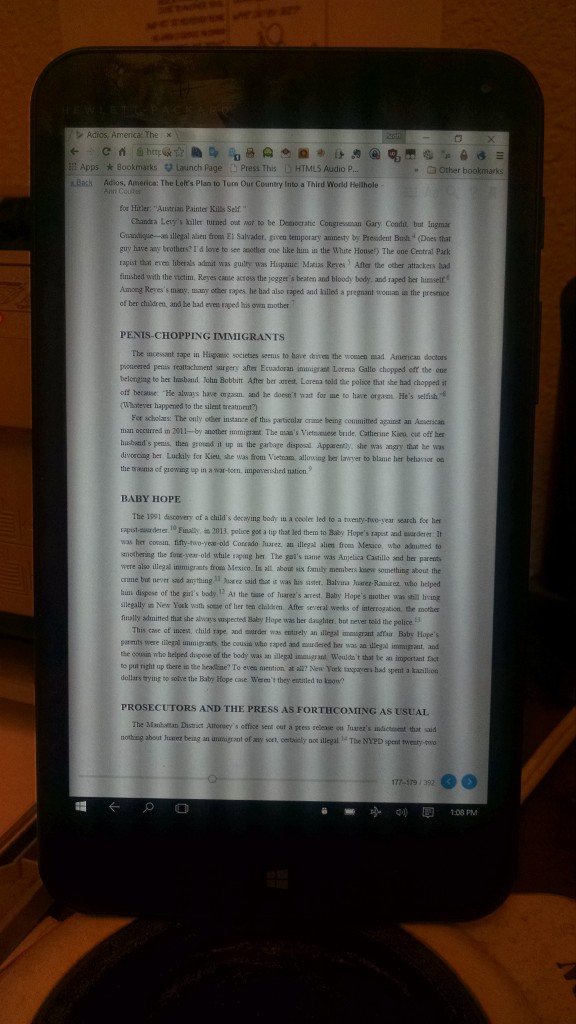
IMG_20151104_130807Here’s the end result…note that the tablet’s in airplane mode.  The screen doesn’t really look like that; it’s some weird interaction between it and the camera in my phone that you’re seeing.

So this is why new files weren’t showing up

Nothing like changing the default behavior of a program in a point release so that users then wonder why it’s not behaving as it should:

ownCloud 8.2 Release Notes

Changes in 8.2

filesystem_check_changes in config.php is set to 0 by default. This prevents unnecessary update checks and improves performance. If you are using external storage mounts such as NFS on a remote storage server, set this to 1 so that ownCloud will detect remote file changes.

Nearly all of the files on my ownCloud server are accessed from Samba shares on the same server; ownCloud is basically how I access my files away from home.  If it’s not monitoring filesystem changes, it will rapidly fall behind on which files have been created and deleted.

Until v8.1, it monitored filesystem changes in the default configuration.  I upgraded to v8.2 over the weekend, which no longer does that unless you add an option to the config file to reenable it.  Grr.

Password requirements FAIL

pwfail

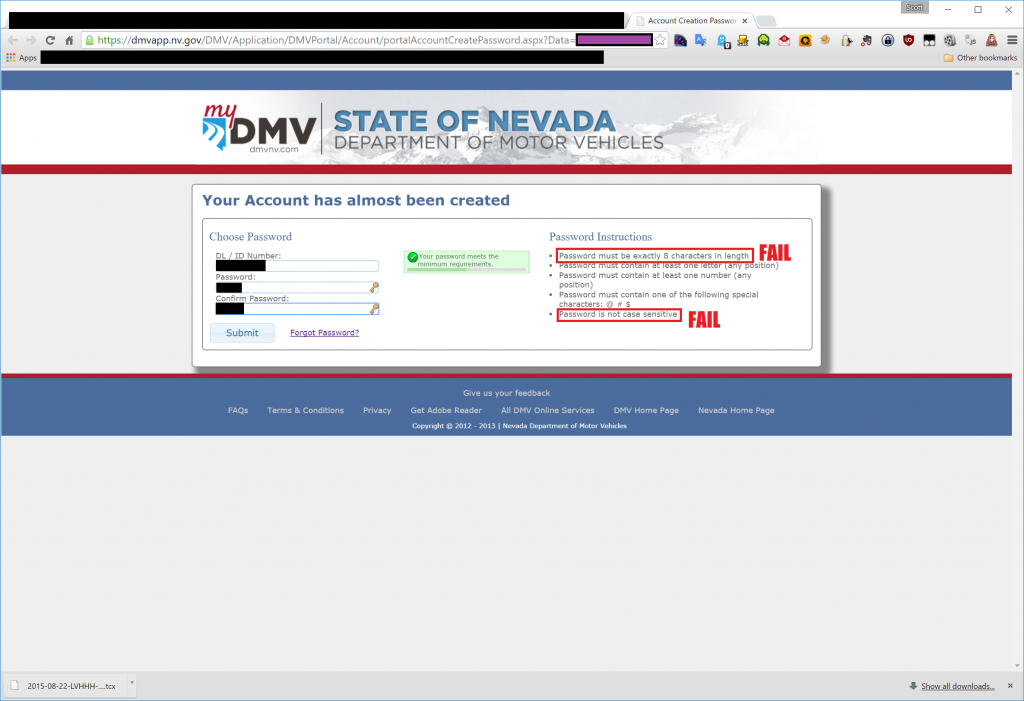
I went to sign up with the DMV website to put in a change of address.  After providing some info off my license and some other bits, they sent a link to the page shown above.

Only eight characters?  Not case-sensitive?  Really?

It also barfed on some of the non-alphanumeric characters KeePass wanted to use…an unstated requirement, apparently, is that only the three non-alphanumeric characters given are acceptable.  I’m used to giving websites passwords that are 20 or more characters of random gibberish to provide plenty of entropy; the limits imposed by the DMV website only allow about 50 bits of entropy, which is fairly weak security.

The length limit suggests that perhaps they’re storing raw passwords in their database, as that’s the only reason to have a length limit.  Even Ashley Madison probably didn’t make that kind of rookie mistake.

(Of course, no post on password strength issues is complete without this: https://xkcd.com/936/)

Backing up your ownCloud contacts & calendars

I’ve had most of my stuff either backed up to Tarsnap or archived to BD-R for a while now, with two exceptions: the contacts and calendars I have stored in ownCloud.  It’s not much information sizewise, but losing everyone’s phone numbers would be a royal pain in the ass.

Backing up contacts is relatively simple; ownCloud provides a URL that grabs them in one shot. Calendars are a bit more problematic, as you probably have more than one. HTTrack is used to grab all of the calendars, which are then concatenated and compressed (except for the contact birthdays calendar, which is auto-generated from your contacts). In my case, the backup is stored in a directory that gets sent to Tarsnap by another script; you could do whatever you want with your backup files.

Set this up as a cronjob; set it to run maybe a half-hour before your backup job. (12345 isn’t really my ownCloud password; I only use that on my luggage. :-) )

#!/bin/bash

source /etc/profile
cd $HOME

# script settings: ownCloud server address, username, password, 
# backup destination

OWNCLOUD=https://home.alfter.us/owncloud
USERNAME=salfter
PASSWORD=12345
DEST=/mnt/files/documents

PREFIX=`echo $OWNCLOUD | sed "s/\/\//\/\/$USERNAME:$PASSWORD@/"`

# retrieve all contacts from ownCloud and concatenate them into one
# compressed file, which then gets sent to Tarsnap with the rest of
# our documents

rm /mnt/files/documents/contacts.vcf* 
wget $PREFIX/remote.php/carddav/addressbooks/$USERNAME/contacts\?export -O "$DEST"/contacts.vcf && \
xz -z9 "$DEST"/contacts.vcf

# do the same with calendars...use httrack instead of wget as there's no
# way AFAICT to enumerate calendars so we can export them

httrack $PREFIX/remote.php/caldav/calendars/$USERNAME -O calendars && \
for i in `find calendars -mindepth 7 -type d | grep -v contact_birthdays`
do
  cat `find $i -name \*.ics` | xz -9 >"$DEST"/calendar-`basename $i`.ics.xz
done
rm -r calendars

The latest firmware for the Asus RT-AC56U doesn’t work right. Avoid it.

33-320-167-TSI just got done getting my settings restored to my router after letting it try to update to the latest version. Version 3.0.0.4.378.4585 killed the web interface, making it unconfigurable.  Restoring the previous version from a TFTP client running on Linux wouldn’t work to set it right, either.  Good thing I had recently added Windows 7 to the empty space on my main computer’s SSD, as a Windows-based unfsck-my-router utility provided by Asus (only downloaded after I had swapped in my trusty old WRT54GL temporarily) was the only thing that would get the router running right again.

I even tried using the aforementioned unfsck-my-router utility to try installing the newer firmware, instead of letting the router update itself again.  That didn’t work either.  The only conclusion I can come to is that something is pretty badly broken in this latest release.  It won’t damage your router (it’s harder to brick than most devices), but rolling it back to working firmware is a bit of a hassle.  I’d recommend skipping this update and hold off for the next release.